Electric Piano
Information in this manual is subject to change without notice and does not represent a commitment on the part of Applied Acoustics Systems DVM Inc. The software described in this manual is furnished under a license agreement. The software may be used only in accordance of the terms of this license agreement. It is against the law to copy this software on any medium except as specifically allowed in the license agreement. No part of this manual may be copied, photocopied, reproduced, translated, distributed or converted to any electronic or machine-readable form in whole or in part without prior written approval of Applied Acoustics Systems DVM Inc.
©2025 Applied Acoustics Systems DVM Inc. All rights reserved. Printed in Canada.
Program Copyright ©2002-2025 Applied Acoustics Systems, Inc. All right reserved.
Lounge Lizard EP is a Trademark of Applied Acoustics Systems DVM Inc. Windows is a registered trademark of Microsoft Corporation in the United States and other countries. Mac OS and Audio Units are registered trademarks of Apple Corporation. VST Instruments and ASIO are trademarks of Steinberg Soft Und Hardware GmbH. AAX is a registered trademark of Avid Technology Inc. All other product and company names are either trademarks or registered trademarks of their respective owner. Unauthorized copying, renting or lending of the software is strictly prohibited.
Visit Applied Acoustics Systems DVM Inc. on the World Wide Web at
The Lounge Lizard EP-5 is a software electric piano based on the classic instruments of the seventies. Each component of these instruments has been modeled with AAS’s cutting edge physical modeling technology to provide realistic and lively sounds. Physical modeling uses the laws of physics to reproduce the behavior of an object. In other words, the Lounge Lizard EP-5 solves, in real time, mathematical equations describing how its different components function. No sampling or wavetables are used, the sound is simply calculated in real time by the CPU according to the values each parameter is receiving. The Lounge Lizard EP-5 is more than a simple recreation of vintage instruments, its parameters can be tweaked to values that are not possible with the real instruments to get some truly amazing new sounds that still retain a warm acoustic quality.
Before discussing the synthesizer in more detail, we would like to take this opportunity to thank you for choosing an AAS product. We sincerely hope that this product will bring you inspiration, pleasure and fulfill your creative needs.
The following minimum computer configuration is necessary to run Lounge Lizard EP-5:
Keep in mind that the computational power required by Lounge Lizard EP-5 depends on the number of voices of polyphony and the sampling rate used. These computer configurations will enable you to play the factory sounds with a reasonable number of voices but performance will vary depending on your specific computer configuration.
Installation and authorization of Lounge Lizard EP-5 is quick and easy. For the installation of our different products we use so-called custom installers which include both the program itself and your licence information. Installation and authorization can therefore be carried out automatically in a single step and from a single file when your computer is online. AAS products use a proprietary challenge/response key exchange for copy protection, meaning their authorization does not rely on third-party software or hardware.
In order to start the installation process, simply double-click on the installer file that you have downloaded. This will first install the program and then use the licence information included in the custom installer file to carry out automatically the challenge/response procedure.
Once the installation is completed, you can check your licence information by starting the program and clicking on the product logo in the top of the interface. This will open a dialog box in which you should see your serial number and the email address which you used in order to get the installer file. Note that your serial number is also sent to you by email when your custom installer is created.
If your computer is offline when running the installer, or if the authorization procedure could not be completed for another reason, the dialog box will not show your serial number and you will be prompted to authorize the program. In that case, click on the Authorize button and follow the on-screen instructions. Note that it is possible to use the program for 15 days before completing the authorization process. After that period, the program will not function unless it is authorized.
Lounge Lizard EP-5 comes with a standalone version allowing you to play it without having to open your sequencer. This can be convenient to explore the instrument and its library, play it live or do some sound design work. To start Lounge Lizard EP-5 in standalone mode, simply follow the instructions below:
Before you start exploring the program, take a moment to set up your audio and MIDI configuration as explained below.
Audio and MIDI configuration tools are accessed from the hardware tab in the Settings window which is accessed by clicking the gear icon next to the preset display in the top of the interface. This setting tab first allows you to select an audio output device from those available on your computer. Multi-channel interfaces will have their outputs listed as stereo pairs.
On Windows, the audio output list is organized by driver type. The device type is first selected from the Audio Device Type drop-down list. If you have ASIO drivers available, these should be selected for optimum performance. The Configure Audio Device button allows you to open the manufacturer’s setup program for your audio interface when available.
Once the audio output has been selected, you can then select a sampling rate and a buffer size from those offered by your audio interface.
The list of available MIDI inputs appears at the bottom of the dialog. Click on the checkbox corresponding to any of the inputs you wish to use.
Lounge Lizard EP-5 comes with a factory library which offers a huge range of sounds before you have even turned a single knob. As you would expect, the best way of coming to grips with the possibilities Lounge Lizard EP-5 offers is simply to go through the sounds one at a time.
A sound or preset is a stored set of parameters corresponding to a given sound. The programs are grouped and organized in packs. The names of the currently loaded pack and sound are displayed at the top of the interface.
You can navigate through different packs and sounds using the drop-down menu, which opens when you click on the preset name at the top of the interface. You can also browse sounds by clicking the left and right arrows next to the preset display box at the top of the interface or by using the arrow keys on your keyboard.
Sounds are managed using the Library Browser which is revealed by clicking on the Library button located to the left of the preset display box. Playing and organizing sounds is straightforward. See Chapter 4 for a complete guide to pack and preset management.
Lounge Lizard EP-5 integrates seamlessly into the industry’s most popular multi-track recording and sequencing environments as a virtual instrument plug-in. Lounge Lizard EP-5 works like any other plug-in in these environments so we recommend that you refer to your sequencer documentation if you have problems running Lounge Lizard EP-5 as a plug-in. Note that, in plug-in mode the audio and MIDI inputs, sampling rate, and buffer size are determined by the host sequencer.
AAS technical support representatives are on hand from Monday to Friday, 10am to 6pm EST. Whether you have a question about Lounge Lizard EP-5, or need help setting it up as a plug-in in your favorite sequencer, we are here to help. Contact us by email or phone at:
Our online support pages contain downloads of the most recent product updates and answers to frequently asked questions on all AAS products. The support pages are located at:
www.applied-acoustics.com/support/
There are two main types of electric pianos: one uses the vibrations of a metal bar, while the other relies on the vibrations of a metal reed.
The mechanism of an electric piano is relatively simple and is illustrated in Figure 1. A note played on the keyboard releases a damper and activates a felt-tipped hammer that hits a metal bar shaped like a tuning fork. The struck portion, called the tine, is made of stiff steel wire, while the other part, parallel to it, is called the tone bar. The tone bar acts as a resonator, adding sustain to the sound. The vibrations of the tine are picked up by an electromagnetic pickup and sent to an amplifier, much like in an electric guitar. The result is a highly expressive instrument with a characteristic smooth tone that can also growl or bark when played harder, as the pickups introduce nonlinear distortion.

The functioning of a reed electric piano is very similar to that of a tine-based instrument, except that instead of a fork, the hammer hits a thin metal reed as shown in Figure 2 and Figure 3. All the reeds for the piano are mounted on a shared metal reed bar. The reeds are placed near a metal plates called a pickup plate. This plate, also referred as “comb’, runs the length of the reed bar and has individual sections corresponding to each note, through which the reeds can oscillate.
Together, the reed bar and the pickup plate form a variable capacitor or electrostatic pickup system. When a reed vibrates after being struck, the distance between the reed and the pickup plate changes, causing a variation in capacitance. This varying capacitance, in the presence of a polarizing voltage, induces a small alternating current (AC) signal in the pickup plate. It is this weak signal that is amplified and converted to sound through loudspeakers.


Electric pianos allowed adjustment to pitch, timbre, and volume. On tine-based pianos, the tine is fitted with a spring which can be moved along its length for fine-tuning. The tone and volume can also be adjusted by changing the position of the tine in relation to the pickups. Tuning a reed-based piano is even more delicate. On the tip of each reed is a lump of solder whose size and shape alter both the pitch and the tone of the note. These adjustments defined the character of electric pianos, shaping their harmonic content, attack, and decay, and offering each player a unique tone. However, this flexibility came at a cost —changing the sound of an electric piano required painstaking hours with a screwdriver or soldering iron, along with incredible patience.
Say goodbye to the hassle with Lounge Lizard! Its preset library offers a carefully curated selection of configurations that recreate popular models, letting you start playing immediately —no tweaking required. The powerful engine grants access to all the instrument’s physical parameters, allowing you to fine-tune each preset to match your playing style.
Lounge Lizard EP-5 is a comprehensive electric piano solution, featuring detailed modeling of all electro-mechanical piano components, an extensive sound library, and a versatile multi-effects module. It includes two distinct synthesis engines: one for tine-based pianos and another for reed-based pianos, each with its own interface. Both the piano engines and effect modules can be accessed in Simple or Expert mode, as shown in Figures 4 –8.
Simple mode should be sufficient for most playing situations, while Expert mode allows for in-depth editing of various piano and effect parameters for sound design purposes. For the piano section of the interface, you can switch between Simple and Expert modes using the toggle in the upper-left corner of the piano engine interface. To view the effect modules in Expert mode, click the gear icon in the lower-right corner of each module, or click the gear icon in the box to the right of the modules to view them all at once.
The top and bottom parts of the interface are common to all modes. The top section includes a preset browser, used to access and manage sounds, as well as general settings and indicators. These tools are described in detail in Chapters 4 and 6. The lower part of the interface includes a keyboard, which allows you to play different notes across the piano’s range, which is useful when no MIDI keyboard is connected to the computer.
You can adjust the graphical interface size by clicking and dragging the handle in the lower-right corner. Note that the zoom factor can also be adjusted in the application settings, as described in Chapter 4.
The Simple view is designed for most playing situations. It provides a basic equalizer, a tremolo, and quick access to key parameters of the effects chain, allowing you to adjust individual modules easily and toggle them on or off. The order of the effects in the signal path can also be changed by clicking the arrows on the borders between the effects modules.


The Expert view provides access to all piano parameters. These parameters are grouped into six modules, each corresponding to a key component of an electric piano: Hammer, Fork, Damper, EQ, Pickup, and Tremolo. Each module will be reviewed in detail in Chapter 5.
The Expert view provides access to all piano and effects parameters. The piano parameters are grouped into six modules, each corresponding to a key component of an electric piano: Hammer, Fork, Damper, EQ, Pickup, and Tremolo. Each module will be reviewed in detail in Chapter 5.


The multi-effects module features an Equalizer, a Compressor, and a Reverb, plus two additional effects modules, chosen from the following: Delay, Distortion, Chorus, Flanger, Phaser, Wah-Wah, Auto-Wah, Notch Filter, Guitar Amp, Tremolo, Equalizer, Compressor, and Reverb. Presets can be saved and loaded for individual modules, as well as for the complete effects rack. The order of the effects can also be changed by click-dragging the handle to the left of each module. The functionality of these effects modules is described in detail inChapter 5.

In this section, we review how to browse and manage the preset library. We also explain how to back up and share presets, as well as how to import presets from Lounge Lizard EP-4.
Sounds are created by assigning specific values to the different parameters of the synthesizer. These parameter combinations are saved as presets, which can later be recalled. Presets are organized into packs, which essentially act as folders.
The packs available in the library are grouped into three sections:
The name of the currently loaded preset appears at the top of the interface in the preset display box, as shown in Figure 9. Just below the preset name, you can see the pack category, the pack name, and the preset’s category. The image associated with the currently loaded pack is displayed to the left of the preset display box.
The list of presets in the currently selected pack is revealed by clicking the name of the preset in the display box. Clicking a new name in the list loads that preset into the synthesizer. You can also navigate through presets in the current pack using the left- and right-pointing arrows located to the right of the preset name.
Note that after clicking on the preset name or selecting a new preset, the left and right-pointing arrows become surrounded by an orange line. This indicates that the arrow keys on your keyboard can now be used to navigate through the preset list. This feature is deactivated as soon as you click another part of the interface or press the Escape key.
You can also explore other packs from the preset display box. The first option in the drop-down list (which appears after clicking on the preset name) is Library. Hovering over this option reveals a list of all packs in the library. Hovering over a pack name opens a sublist of the presets it contains. Clicking a preset in one of these sublists loads it into the synthesizer and switches the current pack.

Presets are saved using the Save or Save As commands in the menu revealed by clicking the ellipsis icon to the right of the preset name in the preset display box. When a preset has just been loaded, the Save command is greyed out and therefore inactive. It becomes active as soon as a parameter on the interface is modified, and an edited label also appears just before the ellipsis icon.
Clicking the Save command replaces the stored version of the preset with the new one. Note that the Save command is never active when browsing AAS factory presets, as these are read-only and cannot be modified. However, a new copy of the preset can be created using the Save As command.
A new copy of a preset is saved using the Save As command, located just below the Save command. This opens the Save Sound pop-up window. Enter the name of the new preset at the top of this window. Then select the destination pack. If needed, a new pack can be created by clicking the New Pack button. Presets are saved with a category attribute, selected using the Category drop-down list. This attribute is useful for searching and organizing presets, as explained in the next section. You can also enter the preset creator’s name and add notes, which are useful for describing the preset or providing playing instructions.
The Undo and Redo commands can be accessed by clicking the ellipsis icon in the right section of the preset display. These commands let you step through all modifications made to presets since the application was launched. Use Undo to revert changes, and Redo to reapply them.
The Compare command, found in the same menu, is used to toggle between Edit and Compare mode. It becomes active after a modification has been made to the current preset. This allows you to switch between the edited and original versions of a preset to compare them. While in Compare mode, editing is disabled. To resume editing, click the Compare command again to exit Compare mode.
Packs and presets are managed using the library browser, which can be opened by clicking the Library button located to the left of the preset display box at the top of the interface (see Figure 9).

The library browser is organised into three sections as shown in Figure 10. The first column on the left displays the various packs in the library. The middle column shows a list of presets, generated by combining the presets from the selected packs and applying the filters found in the third column of the browser. This right-hand column also displays additional information related to the currently loaded preset.
A preset is loaded into the Lounge Lizard EP-5 engine by clicking its row in the preset list. Once loaded, the corresponding row becomes highlighted. You can also navigate through the list using the arrow keys on your keyboard.
Presets have various attributes associated with them. These attributes are listed in the top row of the preset list, and you can sort the list by any attribute by clicking its label. The same attributes are also shown in the Information section in the right-hand column of the browser, where they can be edited for user presets.
The first attribute is the Index, which indicates the preset’s position within its pack. When MIDI program changes are used, this index is interpreted as the program number. Next is the Name of the preset, followed by its Favourite status. You can mark a preset as a favourite by clicking the star next to its name. This can also be done from the preset display box when the browser is closed.
The Category attribute comes next and can be selected from a predefined list. After that is the Engine attribute, which indicates whether the preset uses a tine or reed engine. This is assigned automatically and cannot be changed. The Sound Designer attribute follows, displaying the name of the person who created the preset.
The Location attribute shows the path of the pack where the preset is stored. Like the Engine, this attribute is assigned automatically. The final attribute is a Description, which appears at the bottom of the right-hand column.
To generate a list of presets, first select one or more packs from the left-hand column. You can select a pack by clicking on it, and select multiple packs by holding the Ctrl/Control key while clicking. All packs within a section can be selected at once by clicking the button to the left of the section label.
You can further refine the preset list by applying filters based on attributes such as preset name, favourite status, engine type, category, or sound designer. These filters are located at the top of the right-hand column. When a filter is active, its label becomes highlighted. A Clear button appears above the filter list, allowing you to remove all filters at once.
Note that the preset list in the preset display box at the top of the interface (revealed by clicking the name of the preset) is the same as the one shown in the browser. Its contents reflect the currently selected packs and any active filters. However, you can still browse the entire library from this menu by clicking Library at the top of the list and navigating through the pack submenus.
You can organize your presets using user packs. This is where you’ll store your own creations, as well as any modifications of factory and expansion pack presets.
The library always include by default a user pack called User. To create a new empty pack, click the ellipsis icon next to the User section label and choose the Create Pack command. You can also duplicate an existing user pack —along with all its contents —by clicking the ellipsis icon that appears when selecting a user pack and choosing the Create Pack command.
To rename a user-created pack, right-click the pack or click the ellipsis icon on it and choose the Rename command. To delete a pack, select the Delete command. Before the pack is deleted, its contents will be copied to a special Trash pack that appears at the bottom of the pack list. Clicking this folder displays its list of presets. This allows you to recover presets by copying them from the Trash back into a user pack.
You can empty the trash by clicking the icon to the right of the Trash label and choosing the Empty Trash command. Note that this action cannot be undone.
You can copy presets from one pack to another by clicking its row in the preset list, clicking the ellipsis icon, and selecting either the Copy or Copy to command. The Copy command lets you copy the preset to a specific pack by then clicking the ellipsis icon on the destination pack and selecting Paste. The Copy to command displays a list of available destination packs from which you can choose. You also have the option to create a new pack if needed.
In a similar manner, user presets can be moved to another user pack by using the Move to command in the preset command menu.
Individual presets or multiple selected presets can also be copied or moved to another pack by dragging them from the preset list onto a destination pack.
A block of presets (a contiguous selection) can be selected by holding the Shift key and clicking the last preset row of the desired range, starting from the currently selected preset. A non-contiguous selection can be made by holding the Ctrl/Control key and clicking on different preset rows.
User packs are stored on disk as files. These files can be accessed directly from Lounge Lizard EP-5 by clicking the ellipsis icon next to the User label in the left-hand column of the browser, or on any user pack, and selecting the Show Pack Directory command.
On Windows, this command opens an Explorer window at the location where the files are stored. On macOS, it opens a Finder window. All pack file names follow the same format: the pack name followed by the .EP-5 Pack extension.
The simplest way to create a backup of your packs is to copy these folders to external media.
Presets can easily be shared with other Lounge Lizard EP-5 users by exchanging user pack files. On the source computer, right-click the ellipsis icon next to the User label in the pack column and select the Show Pack Directory command, as described in Section 4.5. Then, copy the file corresponding to the pack you wish to share.
On the destination computer, use the Show Pack Directory command again and copy the pack file into the folder where user packs are stored. Once the new pack file appears in this folder, it will automatically become available in the Lounge Lizard EP-5 library browser.
Note that individual presets cannot be exported on their own —they always reside within a pack file. If you only wish to share a few presets, create a new pack, copy the desired presets into it, and share the corresponding pack file.
Lounge Lizard EP-5 includes a converter that allows you to import presets from Lounge Lizard EP-4. The conversion process simply involves copying a Lounge Lizard EP-4 pack file into the Lounge Lizard EP-5 pack folder. The conversion is then triggered automatically when Lounge Lizard EP-5 detects a pack from a previous version.
Lounge Lizard EP-4 preset packs can be found by clicking the Manage button at the top of the Lounge Lizard EP-4 interface to open the preset manager, then clicking the Show Files button at the bottom of the manager window. On Windows, this command opens an Explorer window at the location where the Lounge Lizard EP-4 pack files are stored; on macOS, it opens a Finder window.
Once you have located the Lounge Lizard EP-4 files you wish to import, go back to Lounge Lizard EP-5, click the Library button at the top of the interface to open the browser, then click the ellipsis icon next to the User label in the left-hand column and choose the Show Pack Directory command. This will again open a Finder or Explorer window, depending on your operating system. Copy the Lounge Lizard EP-4 files you want to convert into this folder —they will automatically be converted to Lounge Lizard EP-5 packs and appear in the browser.
While the vast majority of presets should be recovered without noticeable differences, the conversion process is not infallible and some presets might need some readjustments after the conversion. This is due to the fact that the mapping of the parameters from different versions of Lounge Lizard EP-5 is not direct as a result of changes in the in the synthesis engine.
Note: AAS expansion packs for Lounge Lizard EP-5 that were already installed on your computer before installing Lounge Lizard EP-5 should not be converted manually. The Lounge Lizard EP-5 installer downloaded from our server includes your expansion packs and installs them automatically. If this did not happen, or if some packs appear to be missing, please log in to your AAS user account and download the latest installers. These packs have all been updated and optimized for compatibility with Lounge Lizard EP-5.
This section serves as a reference for the various controls found on the Lounge Lizard EP-5 graphical interface.
As discussed in Chapter 3, Lounge Lizard EP-5 features two distinct synthesis engines: one for tine-based pianos and another for reed-based pianos, each with its own dedicated interface.
The interface can be used in either Simple or Expert mode, accessible via the switch in the upper-left corner of the piano interface. The Simple view provides access to a limited set of performance parameters and is sufficient for most playing situations. The Expert view exposes all parameters of the synthesis engine and is intended for in-depth preset editing.
The bottom part of the interface includes effects modules, which appear in Simple mode. To view a specific module in Expert mode and access all of its parameters, click the gear icon in the lower-right corner of the module. To view all effects modules at once in Expert mode, click the gear icon in the box to the right of the effects module line.
We begin by describing the behavior of the different types of controls on the interface. We then detail the various controls of the piano —first in Simple mode, then in Expert mode. This chapter concludes with a detailed description of the different effects modules.
Note that while the Tine and Reed piano engines sound different and have distinct interfaces, they share similar modules and most of their parameters. In this chapter, we will use the interface of the tine-based engine to illustrate the various modules —except when the reed-based piano differs.
Most parameters are adjusted using knobs. A coarse adjustment is obtained by click-holding the parameter and moving the mouse (or the finger on a track pad) either upwards and downwards or leftwards and rightwards. The numerical value of the parameter is displayed while it is being adjusted.
Fine adjustment of a control is obtained by holding down a modifier key of the computer keyboard (Shift, Ctrl, Command or Alt key) while adjusting the parameter.
Double clicking on a knob brings it back to its default value when available.
Switches are toggled on or off by clicking on them. They are used to turn some modules on or off, activate or deactivate some features and to switch between the Simple and Expert mode of the piano interface.
Clicking on an ellipsis icon reveals a drop-down menu with a set of possible settings for a control or commands which can be executed.
Different parameters can be modulated using the pitch of the note played or the MIDI velocity signal. These modulation signals are controlled with the small knobs labeled Key and Vel, located to the right of the corresponding control knobs in the various modules of the instrument.
The Key modulation knobs allow a parameter to vary depending on the pitch of the note played. The modulation is applied relative to middle C (C4, MIDI note 60), whose value always corresponds to the setting of the main parameter knob. Positive values increase the parameter’s value for higher notes and decrease it for lower notes. Negative values have the opposite effect —increasing the parameter’s value for lower notes and decreasing it for higher notes. When the modulation amount is set to zero, the parameter remains constant across the entire keyboard range.
The Vel modulation knobs are used to modulate a parameter based on the MIDI velocity of the note played. In other words, the harder a note is played on the keyboard, the more the parameter value increases. The position of the Vel knob adjusts the amount of modulation applied. When turned fully counter-clockwise, the modulation is turned off and the parameter remains unaffected by velocity. Turning the knob clockwise increases the influence of velocity on the parameter.
The rate of the Tremolo module and certain effects can be synchronized to the clock of the host sequencer. To enable synchronization, simply turn on the Sync switch or button. The Rate knob is then used to select the sync value, ranging from 16 quarter notes (equivalent to 4 whole notes) to 1/8 of a quarter note (a thirty-second note). The duration of a whole note is determined by the host sequencer’s tempo.
Synchronization can also be set to triplet (t) or dotted (d) note values.
Editing the piano modules is done in Expert mode, which is activated by clicking the Simple/Expert switch located in the top-left corner of the piano section of the interface. This mode allows you to go ’under the hood’ and adjust various piano parameters, enabling you to customize the instrument’s tone and behavior. On vintage instruments, voicing was done with a screwdriver and a lot of patience —now, you can achieve the same results with just a few clicks.
The Hammer module simulates the force of impact produced by the piano hammer when it strikes the fork of the piano. It features three main parameters: Stiffness, Noise, and Force.

The Stiffness knob determines whether the hammer is soft or hard, depending on its material. Turning this knob clockwise increases the hardness of the hammer. Figure 11 illustrates the effect of stiffness adjustment on the output signal from this module. As stiffness increases, the excitation signal becomes narrower, reducing the interaction time between the hammer and the fork. This can be understood by considering that the harder the hammer, the more quickly it rebounds after striking the fork, thereby limiting the duration of contact. A softer hammer (knob turned to the left) produces a more mellow tone, while a harder one yields a brighter sound.
The Key modulation knob controls how the hammer’s stiffness relates to the pitch of the notes played on the keyboard. Turning this knob to the right makes the hammer stiffer as the pitch increases. This behavior is typical of acoustic pianos and other hammer-driven instruments.
Similarly, the Vel (velocity) knob controls how the hammer’s stiffness responds to the velocity of the keystrokes. Turning this knob clockwise causes the hammer to become softer when playing harder and stiffer when playing more softly. This, too, mimics the behavior of real acoustic instruments.

The Force knob is used to adjust the amplitude of the impact of the hammer on the fork as illustrated in Figure 11. When in its leftmost position, the impact is very soft and as the knob is turned clockwise, the impact gets stronger. The strength of the impact can be modulated both with the pitch of the note played and the velocity signal from the keyboard using the Key and Vel modulation knobs respectively. For example, the strength of the impact of the hammer could be made higher for high notes than low notes by turning the Key modulation knob to the right. It could also be adjusted to follow the velocity signal from the keyboard by turning the Vel knob clockwise.
The Force knob adjusts the amplitude of the hammer’s impact on the fork, as illustrated in Figure 11. In its leftmost position, the impact is very soft. As the knob is turned clockwise, the impact becomes stronger.
The strength of the impact can be modulated by both the pitch of the note played and the velocity signal from the keyboard, using the Key and Vel modulation knobs, respectively. For example, turning the Key knob to the right increases the impact force for higher notes compared to lower ones. Similarly, turning the Vel knob clockwise makes the impact strength follow the velocity signal —producing stronger impacts when playing harder, and softer impacts when playing more gently.
The Noise knob controls the amount of noise generated during the impact between the hammer and the fork. Turning it clockwise increases the noise amplitude.
The Pitch knob sets the center frequency of the noise. Turning this knob to the right raises the center frequency of the noise spectrum.
The Decay knob adjusts how long the noise signal takes to fade out. Turning it clockwise increases the decay time. For a more natural sound, a shorter decay is usually preferable.
The Key knob modulates the amount of noise based on the pitch of the notes played. In its center position, the noise level remains the same across all notes, as set by the Noise knob. Turning the Key knob to the left increases the noise for lower notes and reduces it for higher notes. Turning it to the right has the opposite effect —higher-pitched notes will produce more noise than lower ones.
The Fork module lies at the heart of the tine-based engine’s sound generation mechanism. The fork is the component that produces sound after being excited by the hammer. It is shaped roughly like a tuning fork, consisting of a smaller branch called the Tine and a larger one called the Tone Bar.
The Tine is the part of the fork struck by the hammer. It produces a high, metallic sound that is essential to the clarity of electric piano tones.

The amplitude of the tine signal in the final fork output is controlled by the Tine knob. Turning this knob clockwise increases the presence of the tine in the overall sound. The amplitude can also be modulated based on the pitch of the notes played using the Key knob. Turning the Key knob to the left increases the presence of the tine in lower notes while decreasing it in higher ones. Turning it to the right has the opposite effect —increasing tine presence in higher notes and reducing it in lower ones. In its center position, the tine level remains uniform across the entire keyboard range.
The timbre of the tine can be adjusted using the Color knob, which controls the balance between low and high harmonics in the tine’s sound spectrum. Turning the Color knob to the left emphasizes lower harmonics, while turning it to the right increases the relative amplitude of higher harmonics.
The Decay knob adjusts how long the tine continues to sound after a key is pressed and held. Turning it clockwise increases the natural decay time of the tine’s oscillations.
The tone bar is the biggest part of the fork, it is connected to the tine and starts to oscillate when the hammer hits the tine. The Tone knob is used to control the amplitude of the signal from the tone bar present in the final sound. Turning this knob clockwise results in a louder sound from the tone bar. The Decay knob controls the time necessary for the oscillations of the tone bar to fade out when a key is depressed and a note is held. Turning this knob clockwise increases the decay time.
The Tone Bar knob controls the amplitude of the tone bar’s contribution to the final sound. Turning this knob clockwise increases the volume of the tone bar component.
The Decay knob adjusts how long the tone bar continues to oscillate after a key is pressed and held. Turning it clockwise increases the decay time.
The Release knob in the Fork module applies to both the Tine and Tone Bar modules. It controls the decay time of the fork’s oscillations when a key is released and the dampers are applied. Turning this knob clockwise increases the release time.
Note that this parameter differs from the Decay knobs described in the Tine and Tone Bar sections, which control how long the oscillations last when no damper is applied.
The characteristics of the noise produced by the dampers when they are engaged are adjusted in the Damper module, which is described in Section 5.2.6.

The functioning of a reed-based electric piano is very similar to that of a tine-based piano, except that instead of striking a fork, the hammer hits a metal reed, setting it into vibration. All the reeds are clamped onto a shared metal reed bar, a configuration that imposes specific vibration modes and contributes to the characteristic tone of this type of instrument.
The Fundamental knob adjusts the amplitude of the lowest frequency mode—the dominant oscillation that determines the perceived pitch of the sound. Turning this knob clockwise increases the amplitude of this component in the final sound.
The Decay knob controls how long the fundamental mode sustains after a key is pressed and held. Turning it clockwise increases the natural decay time of the reed’s fundamental oscillation.
The reed’s oscillation spectrum includes distinctive high-frequency components that contribute to the unique tone of this instrument. The presence and intensity of these overtones can vary based on factors such as reed quality, age, and cleanliness.
The Overtones knob adjusts the amplitude of these high-frequency components. Turning it clockwise increases their presence in the overall sound. Their amplitude can also be modulated across the keyboard range using the Key knob. Turning it to the left increases overtone presence in the lower register while reducing it in the upper register. Turning it to the right has the opposite effect—increasing overtones in higher notes and reducing them in lower ones. In the center position, the overtone level remains consistent across the keyboard.
The Decay knob in this section adjusts how long the overtones are sustained after a key is pressed and held. Turning it clockwise increases their natural decay time.
The Release knob applies to both the fundamental and overtone components. It controls how quickly the reed’s oscillations fade after a key is released and the dampers engage. Turning this knob clockwise increases the release time.
Note that this parameter differs from the Decay knobs described above, which control sustain time while the key is held. The characteristics of the noise produced by the dampers themselves when they engage are adjusted in the Damper module, described in Section 5.2.6.
The Equalizer module in the Piano section lets you adjust the amount of low and high frequencies in the piano’s output signal. It uses low-shelf and high-shelf filters to shape the sound.

The Bass slider controls the amplitude of low-frequency components. When set to its center position (value of 0), no equalization is applied and the signal remains unaffected. Moving the slider to the right of the middle position (positive values) boosts the low frequencies, while moving it to the left reduces them.
The Treble slider functions similarly, but it affects the amplitude of high-frequency components instead.
For more advanced tone shaping, an additional Equalizer module is available in the Effects rack.
The Pickup module is slightly different in the tine-based and reed-based engines due to the different mechanisms involved in capturing vibrations.
The Pickup module simulates the way a magnetic coil captures the sound of the fork in an electric piano.
The position of the pickup relative to the tine bar is a crucial parameter in determining the tone of the instrument. The shape of the signal measured by the pickup strongly depends on how it is positioned with respect to the tine bar. This geometric parameter is fully adjustable in Lounge Lizard EP-5, as illustrated in Figure 12, allowing for a wide range of tonal colors.


The Sym knob adjusts the vertical position of the pickup relative to the tine bar. In its leftmost position, the pickup is directly in front of the tine. Because the tine moves symmetrically around this point, the first harmonic dominates the measured signal, resulting in a more hollow sound. Turning the knob clockwise moves the pickup vertically away from the tine, breaking this symmetry and increasing the amplitude of the fundamental, which produces a richer sound. Note that this control only allows movement of the pickup above the tine—this is because positioning the pickup below the tine has the same spectral effect as moving it above by an equivalent amount.
The Distance knob sets the horizontal distance between the pickup and the tine bar. Turning this knob clockwise increases this distance, moving the pickup farther away from the tine. As the pickup is moved closer to the tine, the sound becomes more distorted (overdriven).
The In knob controls the amount of signal from the fork entering the pickup, which affects the amount of distortion applied to the signal. As the knob is turned clockwise, the input signal level increases.
The Level knob controls the amount of signal sent from the pickup to the effects section. Turning it clockwise increases this output level. The output signal can also be modulated based on the pitch of the note played using the Key knob. Turning the Key knob to the left increases the output amplitude of lower notes relative to higher ones, while turning it to the right has the opposite effect, boosting higher notes relative to lower ones. In its center position, the output amplitude remains uniform across the entire keyboard range.
Different combinations of the Input and Output settings yield different tonal results. For example, a lower Input level combined with a higher Output setting will produce a cleaner sound, while a higher Input level with a lower Output setting will result in a more distorted tone.
The Pickup module simulates the electrostatic pickup system based on the variable capacitor formed by the reeds and the pickup plate in this type of electric piano.

While reed-based instruments were not originally designed to provide sensitivity adjustments for individual notes, the vertical positioning of the pickup plate relative to the reeds—typically fixed below the reed bar—does influence the tonal character of the instrument. The Sym knob adjusts the pickup plate’s position relative to the reed bar. In its leftmost position, the pickup plate is directly in front of the reeds. As with the pickup in the tine-based engine, the symmetry of the reed motion relative to the pickup plate causes the first harmonic to dominate the measured signal, resulting in a hollow sound. Turning the knob clockwise moves the pickup plate below the reed bar, breaking this symmetry and increasing the amplitude of the fundamental, which produces a richer sound.
The Tone knob adjusts how tightly the reeds vibrate within the slots of the pickup plate, which affects the character of the captured signal. This parameter depends on the exact shape and positioning of the reeds, as well as their overall condition. In its leftmost position, the reed fits tightly in the slot, leaving very little space between the reed and the plate. This introduces some waveshaping in the measured signal, resulting in a brighter, more distorted, or “barking” tone. Turning the knob clockwise increases the gap between the reed and the plate, producing a softer sound.
The In and Level knobs function the same way as in the Pickup module of the tine-based engine, as described above.
The Damper module simulates the noise produced when dampers are lifted from or applied to the fork or reed as a key is pressed or released. This mechanical interaction adds realism and liveliness to the sound.
The Amount knob sets the amplitude (volume) of the damper noise. Turning it clockwise increases the presence of this noise in the sound.
The Tone knob adjusts the stiffness of the dampers. In its leftmost position, the dampers are soft, producing a mellower sound. As the knob is turned clockwise, the dampers become stiffer, and the center frequency of the noise increases, resulting in a brighter, sharper tone.

The Att Rel knob controls when damper noise is introduced, either at the beginning or end of a note, when the dampers are lifted or applied on the fork or reed. When turned to the left, in the Att position, noise is added during the attack phase of notes. When turned to the right, in the Rel position, noise is added during the release phase. In the center position, noise is introduced equally during both the attack and release phases.
Note that the Damper module responds to the sustain pedal signal via the Damper MIDI Control Change message (CC#64). To enable this functionality, set your synthesizer or MIDI controller to send the sustain pedal signal using this MIDI CC number.

The Tremolo module introduces low-frequency amplitude modulation (tremolo) to the sound —an effect commonly associated with electric pianos. The effect can be switched on or off using the On button and it is visible both in Simple and Expert mode.
The Type selector determines the waveform used to modulate the amplitude. A triangle wave produces a smoother, more regular tremolo, while a soft square wave results in a more pronounced, chopped effect.
The Stereo button sets the modulation to either mono or stereo. When the button is engaged, the tremolo operates in stereo mode, causing the sound to alternate between the left and right channels with a 180-degree phase shift. When the button is disengaged, the tremolo is in mono mode, and the modulation is applied equally to both channels.
The Depth knob sets the amount of amplitude modulation applied to the signal —that is, the intensity of the tremolo effect. In its leftmost position, no modulation is applied. Turning the knob clockwise gradually increases the modulation depth.
The Rate knob controls the frequency of the modulation. Turning it clockwise increases the modulation speed, resulting in a faster tremolo rate. Note that this knob is active only when the Sync button is turned off.
Note that, by default, the Depth parameter is controlled via the modulation wheel of your MIDI keyboard. This behavior can be disabled in the application settings, and the parameter can be assigned to a different MIDI controller (CC) as explained in Section 7
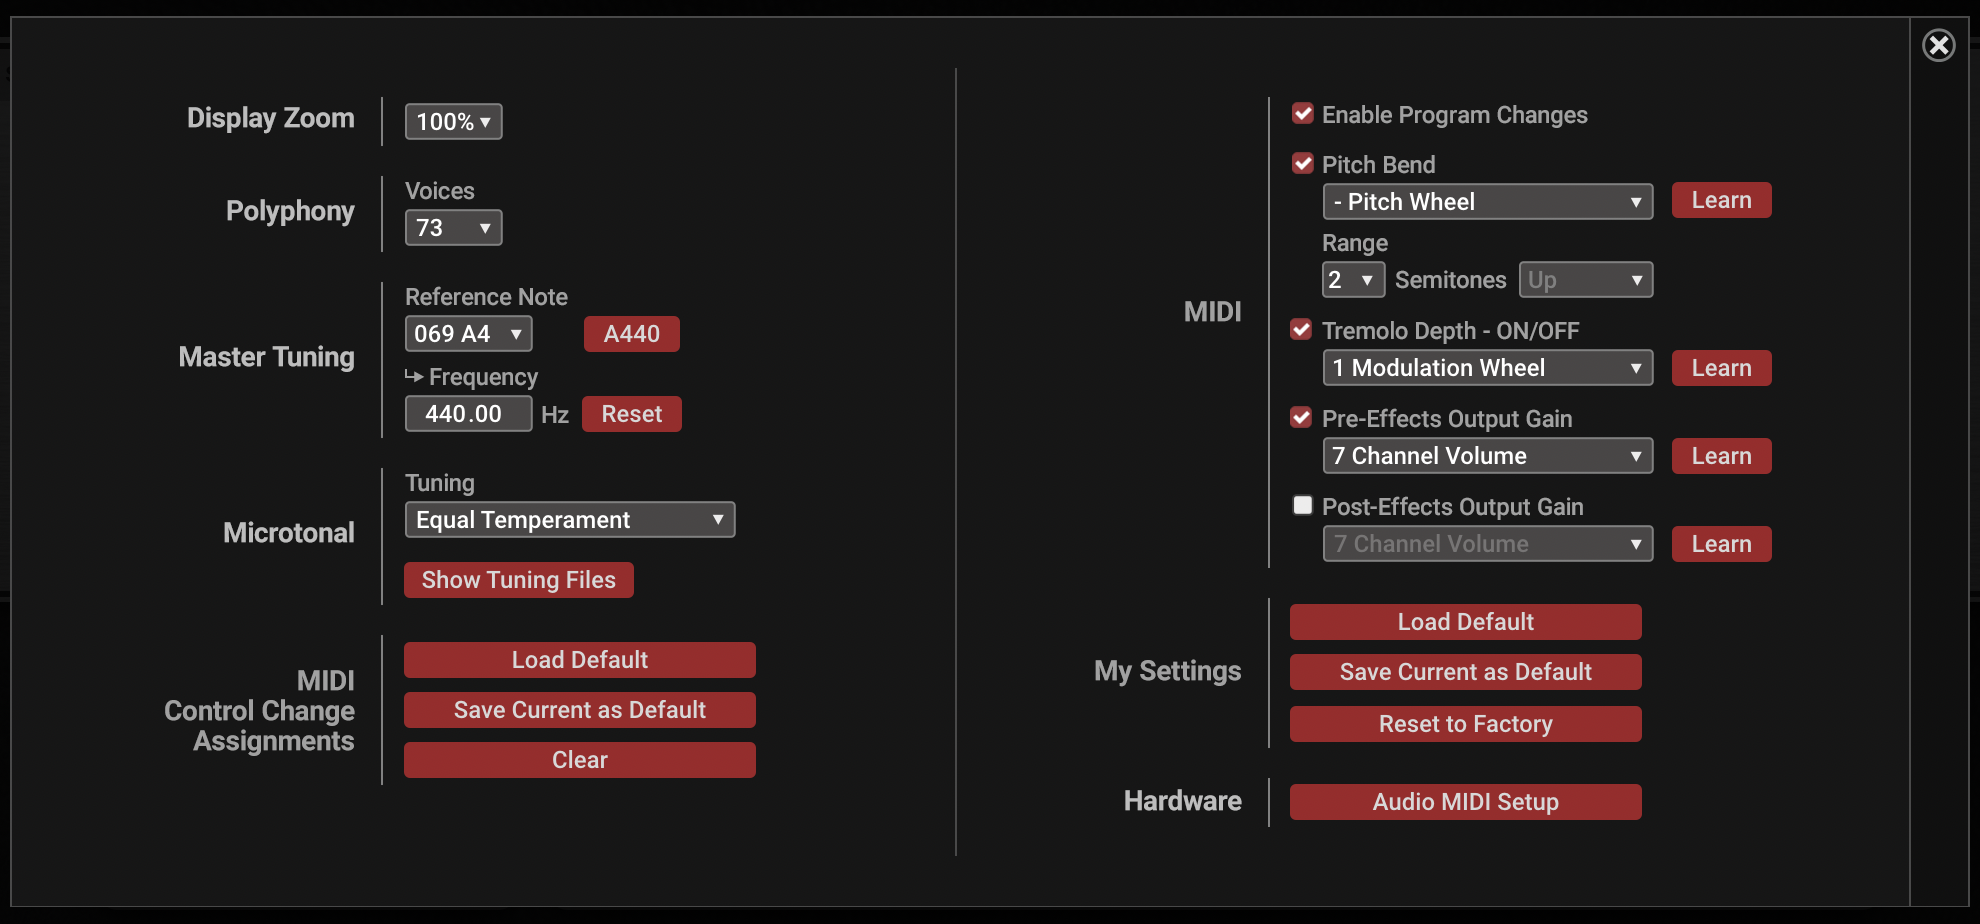
The depth and rate of the Tremolo module can be modulated per-note when using an MPE controller. For more information on using an MPE controller with Lounge Lizard EP-5 please see Sections 8.2.8 and 7.2.1
The Chorus effect is used to make a single source sound like multiple similar sources playing in unison. It simulates the slight variations in timing and pitch that naturally occur when multiple performers play the same part. The effect is produced by mixing the original signal with delayed versions of it, as shown in Figure 13.
In a chorus effect, the delay lines must be short so that the delayed signals blend smoothly with the original, rather than being perceived as distinct echoes. To enhance the effect, the length of these delay lines is modulated, creating a slight perceived pitch shift between the voices.


The Depth knob adjusts the amount of modulation applied to the delay line lengths. When the knob is fully left, there is no modulation and the delays remain constant. Turning the knob clockwise increases the depth of modulation, which increases the degree of detuning between voices.
The Rate knob sets the frequency of the modulation—how quickly the delay length oscillates—adding a vibrato-like motion to the sound. The frequency of the modulation can be synchronized to the tempo of the host sequencer. To enable synchronization, click the Sync button. Then, use the drop-down menu above it to select a rhythmic subdivision for the delay time. Sync values range from 16 quarter notes (equivalent to four whole notes) down to 1/8 of a quarter note (a thirty-second note). The actual duration of these values is determined by the tempo set in the host sequencer.
The Phat button controls the number of voices used in the chorus effect. When enabled, it increases the number of voices, resulting in a richer, thicker sound.
The Spread knob adjusts how widely the voices are distributed across the stereo field. In the leftmost position, both channels carry the same blend of left and right output, making the sound mono. In the rightmost position, the outputs are fully separated: the left output of the chorus is sent only to the left channel, and the right output only to the right channel, creating a wide stereo image.
Finally, the Mix knob controls the balance between the dry and wet signals. When fully left, only the dry (unaltered) input signal is heard. When fully right, only the wet (processed) chorus signal is output. In the center position, the dry and wet signals are mixed equally.

The Compressor module is used to automatically reduce the dynamic range of a signal —that is, the difference between its quietest and loudest parts.
The level at which compression begins is set using the Threshold parameter. This value, expressed in decibels (dB), determines the point at which the input signal level triggers compression. The input level is monitored using the first level meter in the module.
The Ratio parameter controls the amount of compression applied to the part of the signal that exceeds the threshold. It ranges from 1:1 to 1:16 and represents the ratio, in dB, between the signal above the threshold at the input and at the output. For example, a ratio of 1:5 means that if the input exceeds the threshold by 5 dB, the output will exceed it by only 1 dB. Increasing the ratio results in stronger compression.
Two additional controls, Attack and Release, determine how the compressor responds over time. The Attack parameter sets the time, in milliseconds, it takes for the compressor to reach full compression after the input exceeds the threshold. A short attack time causes the compressor to respond quickly, while a longer attack time allows a more gradual onset. The Release parameter works similarly, defining the time the compressor takes to stop compressing once the input signal falls back below the threshold. Both settings shape the responsiveness and character of the compression effect.
The Makeup knob is used to adjust the overall output level of the module. It compensates for any reduction in signal level caused by the compression process, allowing you to maintain a consistent output volume.
The Mix knob controls the blend between dry (unprocessed) and wet (processed) signal. In the leftmost position, only the dry signal is heard. In the rightmost position, only the processed (wet) signal is heard. At the center position, the dry and wet signals are equally balanced.
The Gain Reduction meter, located in the center of the module, displays the amount of compression being applied. This value represents the difference between the input and output levels before the makeup gain is applied.
The Delay module consists of a stereo feedback loop with a variable delay inserted in the loop. It is used to produce an echo effect when the delay time is long (greater than 100 ms), or to color the sound when the delay time is short (less than 100 ms).

The Delay knob adjusts the delay time, in seconds. Turning the knob clockwise increases the delay time. The delay time can be synchronized to the tempo of the host sequencer. To enable synchronization, click the Sync button. Then, use the drop-down menu above it to select a rhythmic subdivision for the delay time. Sync values range from 16 quarter notes (equivalent to four whole notes) down to 1/8 of a quarter note (a thirty-second note). The actual duration of these values is determined by the tempo set in the host sequencer.
The Feedback parameter sets the gain factor —ranging from 0 to 1—applied to the signal at the end of the delay lines. It controls how much of the signal is re-injected into the feedback loop. When set to 0 (leftmost position), no signal is fed back, and the delay occurs only once. Increasing the value reintroduces more signal into the delay lines, extending the echo’s duration for a given delay time. At its maximum setting (1.0), all of the delayed signal is fed back, creating an echo that continues indefinitely.
In addition to this gain control, a low-pass filter can be applied to the feedback signal. The Cutoff knob sets the cutoff frequency of this filter, allowing control over the brightness of the echoes.
The Pan knob controls the balance of the input signal between the left and right delay lines. When fully left, the input is sent only to the left delay line, producing echoes that alternate clearly between the left and right channels —this is the classic ping-pong effect. When fully right, the behavior is mirrored, with the first echo coming from the right channel. Intermediate positions provide more subtle stereo effects. When the Pan knob is centered, an equal amount of signal is sent to both delay lines.
The output of the Delay module is a mix of the original (dry) and delayed (wet) signals. The Wet and Dry knobs adjust the amplitude of each component in the output. Turning either knob clockwise increases the amplitude of that signal path, from silence up to ±6 dB.
The Distortion module offers three different types of distortion, selected using the Shape selector knob.

The Drive knob controls the input gain. It adjusts how strongly the signal is pushed into the nonlinear region of the distortion curve, thereby controlling the intensity of the effect. In its leftmost position, the input signal is attenuated by −6 dB; turning the knob clockwise increases the input gain.
The Tone knob adjusts the color of the signal after distortion has been applied. When turned fully left, high frequencies are attenuated; when turned fully right, low frequencies are filtered out. In the center position, the tonal balance is flat and unchanged.
The Volume knob sets the output gain of the distorted signal, allowing you to control the overall loudness after processing.
Finally, the Mix knob blends the dry (unprocessed) and wet (distorted) signals in the module’s output. In the leftmost position, only the dry signal is heard; in the rightmost position, only the distorted signal is present. In the center position, both are mixed equally.
The Equalizer module provides tone shaping across four distinct frequency bands. For each band, you can select one of the following filter types: low-shelf, high-shelf, second-order low-pass, second-order high-pass, or peaking.
All filters share the same three parameters:

The operation of the low-shelf filter is illustrated in Figure 16. This filter applies a gain to frequencies below the cutoff, leaving higher frequencies unchanged. It can either boost or attenuate low frequencies depending on whether the Gain value is positive or negative.

The high-shelf filter operates similarly (as shown in Figure 15), except it affects frequencies above the cutoff, leaving lower frequencies unchanged.
For both low-shelf and high-shelf filters, increasing the Q factor makes the transition between bands steeper. It also introduces a resonant boost near the cutoff frequency on the amplified side and a slight dip on the attenuated side.

The low-pass and high-pass filters are shown in Figure ??. The low-pass filter attenuates frequencies above the cutoff while preserving those below. The high-pass filter does the opposite: it attenuates frequencies below the cutoff while allowing higher frequencies to pass. Both are second-order filters, which means they can exhibit resonance, with the amount controlled by the Q knob. Their roll-off is 12 dB per octave.

The Peaking filter applies gain to a frequency band centered around the cutoff frequency. When the Gain is negative, the filter behaves like a Notch filter, attenuating a narrow frequency band. When the Gain is positive, it boosts that band instead, as shown in Figure 17.

The Output knob adjusts the overall output level of the module within a ±20 dB range. In the center position, the level is unchanged. Turning it clockwise increases output; turning it counterclockwise decreases it.
The Mix knob controls the blend between dry (unprocessed) and wet (processed) signal. In the leftmost position, only the dry signal is heard. In the rightmost position, only the processed (wet) signal is heard. At the center position, the dry and wet signals are equally balanced.
The Flanger module implements the classic flanging effect, which colors the sound with a false pitch or “whooshing” effect. This is achieved by mixing the original signal with a delayed version of itself, where the delay time varies over time.

As shown in Figure 18, the input signal is routed through a variable delay line. The output of this delay is then mixed with the dry (original) signal and re-injected into the delay line via a feedback path.

The effect introduces notches (rejections) in the frequency spectrum of the signal at odd harmonic intervals of a fundamental frequency, as illustrated in Figure 19. The location of this fundamental frequency, denoted f0, and the spacing between spectral notches, are determined by the length of the delay line:
A longer delay results in a lower fundamental frequency and tighter spacing between harmonics. A shorter delay increases f0 and widens the spacing between harmonics.

The depth of the effect is influenced by the ratio of dry to wet signals in the mix (see Figure 20). As more wet signal is added to the mix, the rejection notches become more pronounced. In addition, the frequency response is shaped by the amount of wet signal re-injected into the delay line (Figure 21). Increasing the feedback emphasizes frequencies that are least affected by the delay —typically at even harmonic intervals—sharpening spectral peaks and creating an apparent pitch shift.


The Delay knob sets the base delay length in milliseconds. This delay can be modulated by an amount determined by the Depth knob. When the Depth knob is in its leftmost position, no modulation occurs and the delay remains constant. As the knob is turned clockwise, the length of the delay line begins to oscillate, with the modulation depth increasing accordingly.
The speed of this modulation is controlled by the Rate knob, which sets the oscillation frequency. The frequency of the modulation can be synchronized to the tempo of the host sequencer. To enable synchronization, click the Sync button. Then, use the drop-down menu above it to select a rhythmic subdivision for the delay time. Sync values range from 16 quarter notes (equivalent to four whole notes) down to 1/8 of a quarter note (a thirty-second note). The actual duration of these values is determined by the tempo set in the host sequencer.
The Feedback knob adjusts how much of the delayed signal is fed back into the delay line, shaping the overall intensity and tonal color of the effect.
Finally, the Mix knob determines the blend of dry and wet signal at the output. When turned fully to the left, only the dry signal is heard. In the center position, dry and wet signals are present in equal proportion, and when turned fully to the right, only the processed (wet) signal is output.

The Guitar Amplifier module is a versatile two-channel amp equipped with speaker cabinet simulation and spring reverb. Despite its minimal control set, it offers a wide palette of tones suited to various musical styles.
The amplifier section can be switched on or off by clicking the LED located at the top right of the first section on the left side of the module.
The Voice selector toggles between three available amp voicings.
The Drive knob adjusts the amount of distortion. Turning it clockwise increases gain and saturation.
The Mid knob sets the level of midrange frequencies. In the center position, the midrange remains unaltered. Rotating the knob to the left cuts the mids, while turning it to the right boosts them, by up to ±12 dB.
The Low and High knobs control bass and treble frequencies respectively. These allow for cuts or boosts of up to ±18 dB from their neutral center positions and behave consistently across all amp voices.
The Output knob adjusts the volume level of the amplifier section. Note that this control may subtly affect the frequency response depending on the selected amp voice.
The speaker cabinet simulation is activated using the LED in the upper right corner of the Cabinet section. This feature replicates the tonal coloration of a real guitar speaker and cabinet. The Type selector allows you to choose between an open or closed-back design. An open-back cabinet permits rear-projected sound waves to interact with front-facing ones, resulting in a more resonant and colored tone.
The Spring Reverb section is enabled or disabled by clicking the LED in the top right of the Spring section. The Spring knob controls the amount of reverb applied; turning it clockwise increases the wet signal.
The Mix knob determines the balance between dry and wet signal at the output of the module. In the leftmost position, only the dry signal is heard; in the center position, dry and wet signals are equally mixed; and in the rightmost position, only the wet signal is output.
Finally, the master Output knob controls the overall output level of the module, with a ±20 dB range.
The Notch Filter performs the opposite function of a band-pass filter. Instead of isolating a narrow frequency band, it attenuates frequencies around a specified center frequency while leaving those outside the band unaffected, as illustrated in Figure 22.

Like the Wah Wah effect, the center frequency of the filter can be modulated. The Freq knob sets the center frequency of the notch. Turning it clockwise increases the frequency.

The Depth knob controls the range of modulation applied to the center frequency. As the Depth knob is turned clockwise, the excursion—or amount of variation—increases.
The Rate knob determines the speed of the modulation. Turning it clockwise increases the modulation rate.
The modulation can also be synchronized to the tempo of the host sequencer. To enable sync, click the Sync button, then use the drop-down menu above it to select a rhythmic subdivision. Sync values range from 16 quarter notes (equivalent to four whole notes) down to 1/8 of a quarter note (a thirty-second note). The actual duration of these values is determined by the host’s tempo setting.
The Mix knob allows you to control the blend of dry and wet signals. In its leftmost position, only the dry input signal is heard. In its rightmost position, only the filtered (wet) signal is present. At the center position, the output includes equal parts of dry and wet signal.
Finally, the Output knob adjusts the overall output level of the module.
The Phaser module implements the effect known as phasing, which colors a signal by removing specific frequency bands from its spectrum. This effect is achieved by altering the phase of a signal’s frequency components using an all-pass filter and then mixing the processed signal with the original (dry) signal.

The algorithm implemented in this module is shown in Figure 23. The input signal is sent into a variable all-pass filter. This wet signal is then mixed down with the original dry signal. A feedback line allows the resulting signal to be re-injected into the filter. The effect of the Phaser module is to introduce rejection in the spectrum of the input signal depending on the tuning of the filter.
The algorithm used in this module is illustrated in Figure 23. The input signal is sent into a variable all-pass filter, and the resulting wet signal is mixed with the dry input. A feedback path allows the mixed signal to be re-injected into the filter, intensifying the effect.

The all-pass filter affects the signal by delaying its frequency components by an amount that increases with frequency. These phase variations cause partial cancellations when the wet signal is mixed with the original signal, as shown in Figure 24. Maximum rejection occurs when the phase shift reaches 180 degrees—causing a frequency component to be completely out of phase with its counterpart in the dry signal.
The amount of phasing is determined by the ratio of wet to dry signal, as shown in Figure 24. As more wet signal is added to the mix, the depth of the notches in the frequency spectrum increases. The shape of the Phaser’s frequency response is further influenced by the amount of wet signal re-injected into the feedback loop. Increasing feedback sharpens peaks in the spectrum, especially at frequencies less affected by the all-pass filter.
The Phaser operates similarly to the Flanger module, but the resulting filtering is distinct. Unlike the Flanger, which creates evenly spaced notches in a harmonic relationship, the Phaser introduces rejection at a limited number of frequencies that are not harmonically related.

The location of the first notch in the frequency response is set using the Frequency knob. This frequency can be modulated by an amount controlled by the Depth knob. In its leftmost position, the modulation is disabled and the notch remains fixed. As the Depth knob is turned clockwise, the notch begins to oscillate, with the modulation depth increasing accordingly.
The Rate knob sets the frequency of this modulation. The frequency of the modulation can be synchronized to the tempo of the host sequencer. To enable synchronization, click the Sync button. Then, use the drop-down menu above it to select a rhythmic subdivision for the delay time. Sync values range from 16 quarter notes (equivalent to four whole notes) down to 1/8 of a quarter note (a thirty-second note). The actual duration of these values is determined by the tempo set in the host sequencer.
The Feedback knob adjusts how much wet signal is re-injected into the filter, allowing further control over the sharpness and intensity of the effect.
Finally, the Mix knob determines the balance between dry and wet signal at the output. In its leftmost position, only the dry signal is heard. In the center position, dry and wet signals are mixed equally. In its rightmost position, only the wet signal is output.
The Reverb module is used to recreate the effect of reflections of sound on the walls of a room or hall. These reflections add space to the sound and make it warmer, deeper, as well as more realistic since we always listen to instruments in a room and thus with a room effect. This module is located at the very end of the effects chain in the signal flow.
The Reverb module recreates the natural reflections of sound off the walls of a room or hall. These reflections add a sense of space and depth, contributing warmth and realism to the sound. Since we almost always hear instruments within some physical space, reverberation is an essential part of a natural listening experience.
A common way to evaluate the acoustic response of a room is to clap your hands and listen to the resulting echoes. Figure 25 illustrates the amplitude of such an impulse response over time. The first part of the response is the direct sound—the clap itself—followed by a series of distinct reflections. These gradually become more densely spaced until they merge into a smooth, exponentially decaying tail.
The early part of the response, where individual echoes can still be distinguished, is referred to as the early reflections. The later part, where the reflections form a dense, continuous tail, is known as the late reverberation. The total duration of this response is called the reverberation time (RT).

The perceived size of the virtual space strongly influences the reverberation effect. The Size selector lets you choose from Studio, Club, Hall, and Large Hall settings, simulating environments of increasing volume.
The Decay knob controls the length of the reverb tail, which corresponds to how reflective or absorbent the virtual room’s surfaces are. In real spaces, reverberation time varies across frequencies—very low and very high frequencies are often absorbed more quickly by walls and furnishings. The Low and High knobs adjust this frequency-dependent decay, letting you shape how the reverb behaves across the spectrum.
Another important factor is the geometry of the space. More complex geometries produce a higher number of reflections in a shorter amount of time—a property known as time density. This is adjusted using the Diffusion knob. Higher diffusion creates a smoother, more blended reverb tail, ideal for simulating well-designed concert halls. Lower diffusion can result in audible echoes, which are characteristic of poor acoustic environments.

The Mix knob controls the balance between the dry (direct) and wet (reverberated) signals. This essentially adjusts the perceived distance between the listener and the sound source. In its leftmost position, only the dry signal is heard; in the rightmost position, only the reverberated sound is present. Intermediate positions blend the two, simulating various listener positions within the space.
Finally, the master Output knob controls the overall output level of the module, with a ±20 dB range.

The Tremolo module modulates the amplitude of the sound, creating rhythmic variations in volume. The Rate knob controls the speed, or frequency, of this modulation, while the Depth knob adjusts its intensity—how deep or pronounced the volume fluctuations are. The frequency of the modulation can be synchronized to the tempo of the host sequencer. To enable synchronization, click the Sync button. Then, use the drop-down menu above it to select a rhythmic subdivision for the delay time. Sync values range from 16 quarter notes (equivalent to four whole notes) down to 1/8 of a quarter note (a thirty-second note). The actual duration of these values is determined by the tempo set in the host sequencer.
The Shape knob changes the waveform used to modulate the sound. In its leftmost position, the waveform is a triangle wave. As the knob is turned clockwise, the waveform gradually morphs into a smoothed square wave, altering the feel of the modulation from smooth and flowing to more abrupt and choppy.
The Stereo button switches the module between mono and stereo operation. When the button is on, the module operates in stereo mode, and the modulation is applied with a 180-degree phase difference between the left and right channels, creating a bouncing or panning-like effect. When the button is off, the signal is processed in mono and the same modulation is applied equally to both channels.
Finally, the master Output knob controls the overall output level of the module, with a ±20 dB range.
The Multi-Effect module includes two types of wah effects: Wah Wah and Auto Wah. Both effects enhance a frequency band centered around a varying frequency using a bandpass filter.
In the Wah Wah effect, the center frequency of the bandpass filter oscillates at a rate defined by the user. In the Auto Wah effect, the variation of the center frequency is driven by the amplitude envelope of the incoming signal.

The Freq knob is used to control the central frequency of the filter. Turning this knob clockwise increases the center frequency. In the case of the Wah Wah effect, the center frequency will oscillate around the value fixed by the Freq knob while with the Auto Wah effect, the setting of the Freq will fix the starting point value of the varying center frequency.

The Freq knob sets the center frequency of the bandpass filter. Turning it clockwise increases the frequency. For the Wah Wah effect, this knob sets the midpoint around which the center frequency oscillates. For the Auto Wah effect, it sets the initial value from which the frequency begins to rise in response to the envelope.
The Depth knob controls how far the center frequency can move. In the Wah Wah effect, this excursion is applied symmetrically around the value set by the Freq knob. In the Auto Wah effect, the center frequency starts at the value set by the Freq knob and increases from there. Turning the Depth knob clockwise increases the range of this modulation.
The Rate knob adjusts the speed of modulation. For the Wah Wah effect, turning this knob clockwise increases the modulation rate. For the Auto Wah effect, this knob is labeled Speed and controls the time constant of the envelope follower. Turning it clockwise reduces the time constant, meaning the envelope follower reacts more quickly to changes in input signal amplitude.
For the Wah Wah effect the speed of the modulation can be synchronized to the tempo of the host sequencer. To enable synchronization, click the Sync button. Then, use the drop-down menu above it to select a rhythmic subdivision for the delay time. Sync values range from 16 quarter notes (equivalent to four whole notes) down to 1/8 of a quarter note (a thirty-second note). The actual duration of these values is determined by the tempo set in the host sequencer.
The Mix knob adjusts the balance between dry and wet signal. In its leftmost position, only the dry signal is heard. In its rightmost position, only the wet (effected) signal is present. In the center position, the output contains an equal mix of dry and wet signals.
Finally, the Output knob controls the overall output level of the module.
The utility section is located at the top of the Lounge Lizard EP-5 interface. It provides essential parameters and monitoring tools. For more information on the preset display box, selecting and managing presets and packs, please refer to Chapter 4.

The MIDI LED is located to the left of the master Volume knob. This LED blinks when the synthesizer receives a MIDI signal. If it does not light up, ensure that the host sequencer is sending MIDI data to Lounge Lizard EP-5. In standalone mode, make sure your MIDI controller is properly connected to your computer and selected, as explained in Section 8.
The Volume knob controls the master output level of the application. Turn the knob clockwise to increase the output level of the synthesizer.
The Level Meter displays the RMS (Root Mean Square) level of the left (L) and right (R) output channels from the instrument. Since a limiter is present at the output stage of Lounge Lizard EP-5, it’s important to ensure that the signal amplitude stays within safe levels to avoid distortion.
The 0 dB mark on the meter corresponds to -20 dBFS (decibels relative to full scale). This level is calibrated to represent a mezzo-forte (moderately loud) playing intensity, providing 20 dB of headroom. This range should be sufficient for most playing dynamics, ensuring that no unwanted distortion is introduced in the output signal.
The top (red) LED of the level meter lights up when the signal reaches its maximum allowed value, indicating clipping. A limiter engages when the signal reaches -17 dBFS, creating a smoother transition and preventing harsh distortion before full clipping occurs.
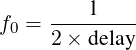
Clicking the gear icon next to the preset display at the top of the interface opens the Settings window (shown in Figure 25). This is where you can configure general parameters of the synthesizer, such as tuning, number of polyphonic voices, pitch bend range, and MIDI assignments. The Settings are organized into five sections, General, MIDI, MIDI Links, Hardware, and About, which can be accessed by clicking on the tabs on the left side of the window.
These settings are global—they are not saved with individual presets and therefore apply to all sounds. In other words, they remain unchanged when a new preset is loaded.
The size of the interface can be adjusted using the Display Zoom drop-down menu. A range of size ratios is available, from small to very large.
You can also resize the interface by clicking and dragging the lower right corner of the window.
The Voices setting allows you to adjust the number of polyphony voices used by Lounge Lizard EP-5. Click on the control and select the desired number of voices from the list.
In general, a higher number of voices is desirable for complex or layered playing. However, keep in mind that CPU usage increases proportionally with the number of active voices.
Musical instruments are typically tuned based on a fixed reference note (such as A440) and a temperament system. The reference note is a specific note with a fixed frequency—commonly 440 Hz for the A above middle C (A4). A temperament is a system of tuning that defines how the octave is divided and determines the frequencies of all other notes in a scale.
By default, Lounge Lizard EP-5 uses equal temperament and a frequency of 440 Hz for A4 (MIDI note 69).
You can transpose the instrument—shifting the pitch of all notes—by adjusting the Frequency value (in Hertz) of the selected reference note. Additionally, you can choose a different Reference Note from the drop-down menu. When a new note is selected, the Frequency parameter automatically updates to reflect its default tuning under A440 and equal temperament.
An interesting feature of Lounge Lizard EP-5 is its ability to use microtonal tunings based on different temperaments through Scala micro-tuning files.
To load a temperament file, open the Tuning drop-down menu, which displays a list of available temperaments. By default, only the Stretched Electric Piano Equal Temperament options are available. Additional temperaments can be added by clicking the Show Tuning Files button and copying your Scala files into the folder that opens.
Once a Scala file is selected from the Tuning menu, Lounge Lizard EP-5 will automatically load the corresponding temperament.
The Reference Note and Frequency settings in the Master Tuning section (explained above) are used to define the base note and its frequency for the selected Scala scale.
Changes made in the Settings window are applied globally to the synthesizer, regardless of the sound currently loaded.
In plug-in mode, settings are automatically saved with your DAW project, meaning they will be recalled the next time the project is opened.
To save your current settings as the default configuration, click the Save Current as Default button. These saved defaults will be used the next time you open a new instance of Lounge Lizard EP-5 in plug-in mode.
To revert to your default settings at any time, click the Load Default button—this is particularly useful when experimenting with changes and wanting to return to your preferred setup.
If needed, you can also restore the factory settings by clicking the Reset to Factory button.
In standalone mode, the program automatically reloads the last used settings from when it was last closed.
Lounge Lizard EP-5 is compatible with the MPE specification allowing for per-note expression when played with an MPE controller. The MPE specification modifies how certain MIDI messages work. Instead of applying pitch bend, channel pressure (also called monophonic aftertouch), and control change #74 (CC#74) globally, MPE assigns each note to its own MIDI channel, allowing these controls to affect individual notes independently.
In Lounge Lizard EP-5, these MPE messages can be used to modulate the depth and rate of the Tremolo module as well as the volume of each note.
To enable MPE mode, simply check the Enable checkbox.
MPE controllers vary in features, and so for the best playing experience, you can choose between two MPE modes using the Mode drop-down menu. The Standard option should work with all controllers unless you use an Osmose controller, in which case the Osmose option should be selected.
The reason for having a specific Osmose mode is that this controller uses channel pressure as an initial touch control that can take any MIDI value between 0 and 127 when a note is played, while CC#74 is used for additional pressure, always starting at 0. This contrasts with most other MPE controllers, where the channel pressure message is used for pressure control (as its name implies) with an initial value of 0, and CC#74 is mapped to either finger position, allowing any initial value, or a tilt control centered around MIDI value 64. In practice, the difference between the two modes is that the assignments associated with the channel pressure and control change #74 (CC#74) are inverted.
For more details on how MPE controls modulate Lounge Lizard EP-5 parameters, please see Section 8.2.8
Lounge Lizard EP-5 responds to MIDI Program Change messages. To turn on/off this feature, simply check or uncheck the Enable option.
When enabled, Lounge Lizard EP-5 will load the sound from the currently selected sound pack whose index number matches the value received in the Program Change message.
If you prefer the software not to respond to Program Change messages, simply uncheck the Enable Program Changes option.
Lounge Lizard EP-5 responds to incoming MIDI pitch bend messages. To turn on/off this feature, simply check or uncheck the Enable option.
By default, the pitch bend range is set to ±2 semitones, but this can be adjusted. To change the pitch bend range, use the Pitch Bend Range drop-down menu to select a new value. The available options are listed in semitones. Selecting a value of 0 semitones will disable pitch bend response entirely.
Note: While pitch bend is typically controlled by the pitch wheel, it can be reassigned to another MIDI controller.
To change the assignment:
The direction of the pitch bend can be modified using the Direction drop-down menu. Note that when the pitch wheel controller is selected, the direction of the pitch bend is always upwards.
The gain level of the signal—before the multi-effects processor—can be controlled via a MIDI controller, such as an expression pedal.
To turn on/off this feature, simply check or uncheck the Enable option.
By default, the MIDI Channel Volume controller is assigned to control this parameter. However, you can assign other MIDI Continuous Controllers (CCs) to this function.
To change the assignment:
The gain level of the signal—after the multi-effects processor—can be controlled via a MIDI controller, such as an expression pedal.
To turn on/off this feature, simply check or uncheck the Enable option.
By default, the MIDI Channel Volume controller is assigned to control this parameter. However, you can assign other MIDI Continuous Controllers (CCs) to this function.
To change the assignment:
The depth of the tremolo effect in the piano engine can be controlled by a MIDI controller.
To turn on/off this feature, simply check or uncheck the Enable option.
By default, this parameter is assigned to the modulation wheel. However, you can assign other MIDI Continuous Controllers (CCs) to this function.
To change the assignment:
When this option is enabled, the Tremolo module of the piano engine will automatically be turned off or on when the value received from the assigned MIDI controller is zero or greater than zero.
Any control on the Lounge Lizard EP-5 interface can be manipulated by an external MIDI controller through a MIDI Control Change assignment or MIDI link.
The list of currently active MIDI links appears in the Assignments table, each row in this table corresponds to a specific MIDI link. For each MIDI link, the following information is displayed: name of the linked parameter, the module it belongs to, the number of the MIDI cc linked to the parameter, and a minimum and maximum value for the parameter if set.
A specific configuration of assignments can be saved as a preset by clicking the Save button. This will open the MIDI Links Preset window which will prompt you to enter a name for the preset. A saved map can be loaded by clicking the Load button. The possibility to load and save assignment maps is convenient if you wish to create different maps for different controllers.
The Clear button can be used to disable all MIDI control assignments at once.
For more details on MIDI Control Assignments, please refer to Section 8.2.3.
This section lets you choose an audio output device from those available on your system. Multi-channel interfaces will have their outputs listed as stereo pairs.
On Windows, the audio output list is organized by driver type. Begin by selecting a type from the Audio Device Type drop-down menu. If available, ASIO drivers should be selected for optimal performance. The Configure Audio Device button lets you launch the manufacturer’s control panel for the selected device, if one is available.
After selecting an audio device, you can specify a sampling rate and buffer size from the options supported by your interface.
At the bottom of the window, you’ll find the list of available MIDI input devices. To activate an input, simply check the box next to the desired device. In standalone mode, it is possible to select the active MIDI channel using the Channel drop-down list.
For more details on audio and MIDI configuration, please refer to Chapter 8.
This section includes useful information such as:
It also includes a link to the PDF version of this manual.
This chapter explains how to select and configure the audio and MIDI devices used by Lounge Lizard EP-5. Audio and MIDI configuration tools can be accessed from the Settings window, which is opened by clicking the gear icon next to the preset display box at the top of the interface.
Note: in plug-in mode, the audio and MIDI inputs, sample rate, and buffer size are controlled by the host sequencer.
Audio configuration tools are accessed by clicking the Hardware tab of the Settings window. The Device drop-down menu allows you to select an audio output device from those available on your computer. If you’re using a multi-channel interface, its outputs will be listed as stereo pairs.
On Windows, the list of available audio output devices is organized by driver type. Begin by selecting a driver type from the Audio Device Type drop-down menu. If ASIO drivers are available, they should be selected for optimal performance. The Configure Audio Device button allows you to open the manufacturer’s setup utility for your audio interface, if available.
Once an audio device is selected, you can then choose a sample rate and buffer size from the options provided by your audio interface.
Latency is the time delay between the moment a control signal is sent to your computer (for example, when you press a key on your MIDI keyboard) and the moment the resulting sound is heard. This delay is primarily determined by the duration of the audio buffers used by both the application and your sound card.
To estimate latency, divide the number of samples per buffer by the sample rate (sampling frequency). For example, a buffer size of 256 samples at a 48 kHz sample rate results in a latency of approximately 5.3 milliseconds. Doubling the buffer size while keeping the sample rate constant will double the latency, while increasing the sample rate to 96 kHz with the same buffer size will reduce the latency to approximately 2.7 milliseconds.
Naturally, it is desirable to keep latency as low as possible. However, Lounge Lizard EP-5 requires a certain amount of time to continuously compute audio in real time. This processing time depends on several factors, including:
Keep in mind that doubling the sample rate (for example, from 48 kHz to 96 kHz) will roughly double the CPU usage, as the software must compute twice as many audio samples in the same amount of time.
Depending on your system, you should choose the smallest buffer size—at a given sample rate—that allows you to maintain real-time performance with a reasonable number of voices.
The list of available MIDI input devices appears in the MIDI section of the Hardware tab of the Settings window. Simply check the box next to any MIDI input you wish to use.
The gain level of the signal—both before and after the multi-effects processor—can be controlled via a MIDI controller, such as an expression pedal. This feature is activated by enabling the Pre-Effects Gain and Post-Effects Gain options in the MIDI section of the Settings window.
By default, the MIDI Channel Volume controller is assigned to control both gain parameters. However, you can assign other MIDI Continuous Controllers (CC) to these functions. To change the assignment, use the drop-down menus next to each gain parameter to select a different MIDI CC.
Alternatively, you can use the Learn buttons: click a button, then send a MIDI CC message from your controller. The corresponding gain parameter will automatically link to the controller that sent the message.
Every control on the Lounge Lizard EP-5 interface can be manipulated by an external MIDI controller using MIDI Control Change (CC) assignments or MIDI links.
To create a MIDI control assignment:
Alternatively, you can use the Assign command after right-clicking (or Control-clicking on macOS) which will reveal the full list of MIDI controllers.
To deactivate a MIDI assignment, right-click (or Control-click) the control on the interface and select the Clear command. To deactivate all MIDI assignments at once, open the Settings window, click the MIDI Links tab and click the Clear button.
The range of each control can be modified by setting a minimum and/or maximum value. In order to set one of these values, set the control at the desired value on the interface, right-click (or Control-click) the control and choose the Set Minimum Value or Set Maximum Value command.
Sets of MIDI assignments, or MIDI maps, can be saved as presets. For more information on loading and saving MIDI maps, please see Section 7.2.1.
Note: MIDI assignments are not saved with individual sound presets. They are global settings that apply across all sounds. When Lounge Lizard EP-5 is used in plug-in mode, MIDI assignments are saved as part of the DAW project and are automatically reloaded when the project is opened. This allows you to use different MIDI assignments in different projects.
Lounge Lizard EP-5 responds to MIDI Program Change messages. To enable this feature:
When enabled, Lounge Lizard EP-5 will load the sound from the currently selected sound pack whose index number matches the value received in the Program Change message.
If you prefer the software not to respond to Program Change messages, simply unckeck the Enable option.
Lounge Lizard EP-5 responds to incoming MIDI Pitch Bend messages. By default, the pitch bend range is set to ±2 semitones, but this can be adjusted.
To change the pitch bend range:
The available options are listed in semitones. Selecting a value of 0 semitones will disable pitch bend response entirely.
Note: While pitch bend is typically controlled by the pitch wheel, it can be reassigned to another MIDI controller. Use the MIDI Control drop-down list of MIDI controllers or the Learn function to link pitch bend to the desired control. Note that the direction of the pitch bend can be adjusted using the Direction drop-down list.
The depth of the Tremolo effect in the piano engine can be controlled by a MIDI controller.
To enable this feature:
By default, this parameter is assigned to the modulation wheel, but you can change the controller by using the MIDI Control drop-down list of MIDI controllers or the Learn function.
The Damper module in Lounge Lizard EP-5 responds to the sustain pedal signal via MIDI Control Change message (CC#64).
To enable sustain pedal functionality, simply configure your synthesizer or MIDI controller to send its sustain pedal signal using (CC#64). Lounge Lizard EP-5 will automatically respond to this message.
Lounge Lizard EP-5 is compatible with the MPE specification, allowing for per-note expression.
In order for Lounge Lizard EP-5 to respond to MPE messages, make sure that MPE is enabled and the desired mode is selected depending on your controller as described in Section 7.2.1.
In Lounge Lizard EP-5, MPE messages can be used to modulate the depth and rate of the Tremolo module as well as the volume of each note. The amount of modulation for each of these parameters is adjusted in the MPE Modulations window as shown in Figures 27 and 28.
To open this window:
In Standard mode, the modulation amount for tremolo depth, rate, and note volume applied by CC#74 is adjusted using the Slide knobs, while the modulation applied by channel pressure is adjusted using the Pressure knobs.
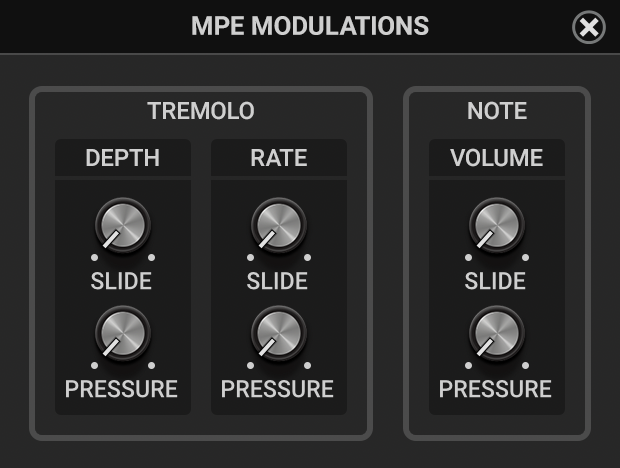
When in Osmose mode, the modulation applied by channel pressure is controlled using the 1st Touch knobs, while that applied by CC#74 is controlled using the 2nd Touch knobs.
Lounge Lizard EP-5 is available in VST2, VST3, AAX, and Audio Units formats and integrates seamlessly with the industry’s most popular multi-track recording and sequencing environments as a virtual instrument plug-in. It functions like any other plug-in in these environments, so we recommend referring to your DAW’s documentation if you encounter any issues running it. Below are a few general points to keep in mind when using Lounge Lizard EP-5 as a plug-in.
When used as a plug-in, the audio and MIDI ports, sampling rate, buffer size, and audio format are determined by the host sequencer. Lounge Lizard EP-5 will follow the configuration set in your DAW.
Lounge Lizard EP-5 supports automation functions of host sequencers. All parameters visible on the interface below the Utility section and related to the synthesis engine can be automatized.
Lounge Lizard EP-5 supports automation within host sequencers. All parameters visible on the interface below the Utility section, including those in the piano and effect sections, can be automated.
You can open multiple instances of Lounge Lizard EP-5 within your host sequencer, just as you would with any standard plug-in.
Lounge Lizard EP-5 supports MIDI Program Change messages. When such a message is received, the current sound is switched to the preset in the loaded pack that corresponds to the program number.
To enable MIDI Program Changes, ensure that the Enable Program Changes option is selected in the Settings panel, as explained in section ??.
Note: Program Changes refer to preset indices within the currently loaded pack.
When you save a project in your DAW, the currently loaded sound in Lounge Lizard EP-5 is saved along with it. This ensures the instrument will be in the same state when the project is reopened.
However, sound packs themselves are not saved with the project. If your project uses MIDI Program Changes, make sure that:
Running Lounge Lizard EP-5 as a plug-in requires CPU processing from both the plug-in and the host sequencer. This demand increases when using multiple instances or when many different plug-ins are loaded.
To reduce CPU usage, consider using your DAW’s freeze or bounce to track functions. These allow you to render the plug-in’s output to audio, avoiding real-time processing during playback.
IMPORTANT —YOUR USE OF THE SOFTWARE IS SUBJECT TO ALL THE TERMS AND CONDITIONS OF THIS END USER LICENSE AGREEMENT (“AGREEMENT”). THEREFORE, PLEASE READ BEFORE DOWNLOADING, INSTALLING OR USING OUR SOFTWARE.
THIS AGREEMENT, MADE AND ENTERED INTO AS OF THE TIME AND DATE OF CLICK THROUGH ACTION, IS A LEGAL AGREEMENT BETWEEN YOU AND APPLIED ACOUSTICS SYSTEMS DVM INC. (“AAS”) AND GOVERNS THE USE OF THE AAS SOFTWARE AND THE DOCUMENTATION MADE AVAILABLE FOR USE WITH SUCH SOFTWARE.
BY CLICKING THE “ACCEPT” BUTTON OR SIMILAR AFFIRMATION AS APPLICABLE WHEN DOWNLOADING OR INSTALLING THIS SOFTWARE, OR BY USING THE SOFTWARE OR DOCUMENTATION, YOU AGREE TO BE BOUND BY THE TERMS OF THIS AGREEMENT AND THAT THIS AGREEMENT GOVERNS YOUR USE OF THIS SOFTWARE AND DOCUMENTATION. IF YOU DO NOT AGREE TO THE TERMS OF THIS AGREEMENT, DO NOT DOWNLOAD, INSTALL OR USE THIS SOFTWARE OR DOCUMENTATION.
IF YOU ARE ENTERING INTO THIS AGREEMENT ON BEHALF OF A COMPANY OR OTHER LEGAL ENTITY, YOU REPRESENT THAT YOU HAVE THE LEGAL AUTHORITY TO BIND THE ENTITY TO THIS AGREEMENT, IN WHICH CASE “YOU” WILL MEAN THE ENTITY YOU REPRESENT. IF YOU DON?T HAVE SUCH AUTHORITY, OR IF YOU DON?T ACCEPT ALL THE TERMS AND CONDITIONS OF THIS AGREEMENT, THEN AAS DOES NOT AGREE TO LICENSE THE SOFTWARE TO YOU, AND YOU MAY NOT USE IT.
1. DEFINITIONS
For the purposes of this Agreement:
1.1. “Affiliate” means, with respect to any entity, any other entity directly or indirectly controlling or controlled by, or under direct or indirect common control with, such entity. For the purposes of this definition, an entity shall control another entity if the first entity: (i) owns, beneficially or of record, more than 50% of the voting securities of the other entity; or (ii) has the ability to elect a majority of the directors of the other entity;
1.2. “Documentation” means all documents, user manuals or other information, available in writing, online or otherwise, relating to the Software;
1.3. “Enhancements” means any new versions, releases, updates, upgrades or other enhancements to the Software, which AAS, in its sole discretion, may make generally available to you, provided that your license is still valid;
1.4. “Intellectual Property” means any and all sound content, presets, ideas, concepts, inventions, methods, processes, know-how, works, software, computer programs and other computer software (including all source and object codes, algorithms, architectures, structures, user interfaces including display screens, lay-out and development tools), databases, designs, plans, drawings, brochures, website content, sales and advertising literature and other marketing materials, and any improvements thereon or applications or derivative works thereof, and all other forms of intellectual property, all whether or not registered or capable of such registration;
1.5. “Intellectual Property Rights” means any and all patents, copyrights, trademarks, trade names and other proprietary rights, and all registrations or applications in relation to the foregoing;
1.6. “Reseller” means an independent third party authorized or accredited by AAS to distribute the Software; and
1.7. “Software” means the AAS software that you purchased through AAS or a Reseller. For greater certainty, all Enhancements shall form part of the Software.
2. LICENSE AND USE OF SOFTWARE
2.1. License to Use. Subject to the terms of this Agreement, AAS hereby grants you a personal, non-exclusive, non-transferable license, without the right to sublicense, to install and use the Software:
a. if you are a natural person and use our Software for non-commercial purposes: on one or multiple computers owned by you and solely for your own personal use and not for commercial purposes (i.e., you do not need to purchase an additional license if you want to use the Software on multiple computers that you own); or
b. if you are a natural person and use our Software for commercial purposes OR if you are a company or another legal entity (for ex., a recording studio or a music school): on a single computer and solely for your own business purpose, including for commercial purposes (i.e., you are required to purchase a separate license for each computer on which you wish to install and use the Software).
2.2. No Implied Rights. Except for the limited rights and licenses expressly granted under this Agreement, nothing in this Agreement grants, by implication, waiver, estoppel or otherwise, to you or any third party any Intellectual Property Rights or license, nor other right, title, or interest in or to the Software or Documentation.
2.3. Purchase through Reseller. If you have purchased the Software from a Reseller, you acknowledge that in addition to the terms of this Agreement, you may also be subject to the terms of the agreement entered into between you and the Reseller. If there is any conflict between this Agreement and the agreement you have with your Reseller, then the provisions of this Agreement will apply to the relation between you and AAS in connection with the Software.
2.4. Functionalities. You acknowledge that your use of the Software in accordance with the terms of this Agreement is neither contingent on the delivery of any future Enhancements to or functionality or features of the Software, nor dependent on any oral or written public comments made by AAS regarding future functionality or features of the Software.
2.5. Restrictions on Use. You are responsible using the Software only in accordance with the Agreement and the Documentation and applicable laws and government regulations. Any right to use or exploit the Software not expressly licensed to you in this Agreement is strictly prohibited, and all rights not expressly set out in this Agreement are reserved by AAS. You may not nor permit third parties to (i) use the Software on any computer in contravention of the license granted to you under Section 2.1, or make copies of any portion of the Software, other than as expressly permitted under this Agreement; (ii) rent, lease, lend, sell, sublicense, assign, distribute, publish, transfer, or otherwise make available the Software and Documentation, or any features or functionality of the Software, to any third party for any reason, whether or not over a network or on a hosted basis, including in connection with the internet or any web hosting, wide area network (WAN), virtual private network (VPN), virtualization, time-sharing, software as a service (SaaS), cloud, or other technology or service; (iii) provide use of the Software in a network, timesharing, multiple CPU, service bureau or multiple user arrangement to users not individually licensed by AAS; (iv) modify, combine or distribute the Software (or any part thereof) with any other software or code in a manner which would subject the Software to open source license terms; (v) translate, disassemble, decompile, reverse engineer the Software; (vi) use the Software or Documentation for purposes of competitive analysis of the Software, developing, using, or providing of a software product or service that competes with the Software, for developing create derivative works based on any portion of the Software or for any other purpose that is to AAS’s commercial disadvantage; (vii) interfere with or disrupt the integrity or performance of the Software; or (viii) remove, delete, efface, alter, obscure, translate, combine, supplement, or otherwise change Intellectual Property Rights or other symbols, notices, marks, or serial numbers on or relating to any copy provided on or with the Software or Documentation.
3. INTELLECTUAL PROPERTY
3.1. AAS Intellectual Property. AAS (or its licensors or suppliers) owns all right, title and interest in and to (i) the Software and the Documentation; (ii) the trademarks associated with the Software or AAS; and (iii) all Intellectual Property and Intellectual Property Rights related to any of the foregoing. You will acquire no rights or licenses to the Software or any other AAS property unless otherwise expressly provided in the Agreement.
3.2. Feedback. AAS owns all right, title and interest in and to any suggestions, requests or recommendations for improvements or enhancement to the Software that you (including any of the Representatives) may, alone or jointly with AAS, propose or make during the term of the Agreement (collectively, “Feedback”). You hereby irrevocably (i) assign all your right, title and interest in and to the Feedback to AAS; and (ii) waive in favour of AAS, its successors and assigns any and all moral rights that you have or may have in the Feedback in each jurisdiction throughout the world, to the fullest extent that such rights may be waived in each respective jurisdiction.
4. TERM; TERMINATION.
4.1. Term. This Agreement commences on the date of acceptance of this Agreement and shall remain in effect until terminated in accordance as set forth in this Section 4.
4.2. Termination. You may terminate this Agreement at any time, upon written notification to AAS. This Agreement will terminate immediately upon notice from AAS if you materially breach this Agreement and such breach: (i) is incapable of cure; or (ii) being capable of cure, remains uncured 5 days after AAS provides written notice thereof. Any such termination by AAS shall be in addition to and without prejudice to such rights and remedies as may be available, including injunction and other equitable remedies.
4.3. Effect of Termination. Upon termination of this Agreement, the license granted herein shall immediately terminate and you must (i) immediately cease using the Software; and (b) destroy all copies of the Software, as well as copies of all Documentation in your possession or control. The provisions of Sections 3, 4.3, 5 and 6 shall survive the termination of this Agreement.
5. WARRANTY DISCLAIMER; LIMITATION OF LIABILITY
5.1. Disclaimer. THE SOFTWARE AND DOCUMENTATION ARE PROVIDED TO LICENSEE ”AS IS” AND WITH ALL FAULTS AND DEFECTS WITHOUT CONDITION OR WARRANTY OF ANY KIND. THE MAXIMUM EXTENT PERMITTED UNDER APPLICABLE LAW, AAS EXPRESSLY DECLINES, ON ITS OWN BEHALF AND ON BEHALF OF ITS AFFILIATES, AND THEIR RESPECTIVE SHAREHOLDERS, DIRECTORS, OFFICERS, REPRESENTATIVES, AGENTS, RESELLERS, SUPPLIERS OR LICENSORS, ANY AND ALL EXPRESS, LEGAL OR IMPLICIT REPRESENTATIONS, WARRANTIES AND CONDITIONS NOT CONTAINED HEREIN, INCLUDING REPRESENTATIONS, WARRANTIES AND CONDITIONS OF MERCHANTABILITY, PERFORMANCE, FITNESS FOR A PARTICULAR PURPOSE, QUALITY AND ACCURACY. IN PARTICULAR, AAS EXPRESSLY DECLINES THE FOLLOWING AND MAKES NO REPRESENTATION OR WARRANTY IN THESE REGARDS: (I) THE FACT THAT THE SOFTWARE WILL MEET YOUR OPERATIONAL REQUIREMENTS; (II) THE FACT THAT THE OPERATION OF THE SOFTWARE WILL BE ERROR-FREE OR UNINTERRUPTED OR, THAT THE RESULTS OBTAINED FROM THEIR USE WILL BE ACCURATE OR RELIABLE; AND (III) THE FACT THAT ALL PROGRAMMING OR SERVICE ERRORS CAN BE CORRECTED OR FOUND IN ORDER TO BE CORRECTED.
5.2. Exclusion of Certain Damages. AAS shall not be liable and assumes no responsibility for any losses or damages arising, directly or indirectly, from your omission to comply with or breach of your obligations hereunder.
5.3. Exclusion of Indirect Damages. TO THE MAXIMUM EXTENT PERMITTED BY LAW, IN NO EVENT MAY AAS, ITS AFFILIATES, OR ITS AND THEIR SHAREHOLDERS, DIRECTORS, OFFICERS, REPRESENTATIVES, AGENTS, RESELLERS, SUPPLIERS OR LICENSORS BE LIABLE FOR (I) ANY INDIRECT, INCIDENTAL, EXTRAORDINARY, CONSEQUENTIAL, SPECIAL, PUNITIVE OR EXEMPLARY DAMAGES OR (II) ANY INTERRUPTION OR DELAY TO USE THE SOFTWARE; (III) LOSS OF REVENUE OR PROFITS, LOSS OF TIME, LOST OF OR CORRUPTION TO DATA, LOSS OF USE, BUSINESS INTERRUPTION, DEPLETION OF GOODWILL OR ANY OTHER FINANCIAL LOSS; (IV) FAILURE TO ACCURATELY TRANSFER, READ, OR TRANSMIT INFORMATION, IN EACH CASE ARISING DIRECTLY OR INDIRECTLY FROM THE AGREEMENT, OR CAUSED BY THE SOFTWARE, OR THE MISUSE OR INABILITY TO USE THE SOFTWARE, OR THE DOCUMENTATION, EVEN IF AAS HAS BEEN ADVISED OF THE POSSIBILITY OF SUCH DAMAGES. AAS SHALL NOT BE LIABLE TO YOU FOR Any damages or costs incurred in connection with obtaining substitute software, receiving support services, claims made against you by others, or similar costs. THIS FOREGOING LIMITATION OF LIABILITY WILL APPLY REGARDLESS OF THE FORM OF ACTION: WHETHER IN CONTRACTUAL LIABILITY, APPLICATION OF THE WARRANTY, TORT, NEGLIGENCE, PRODUCT LIABILITY OF MANUFACTURERS AND VENDORS, STRICT CIVIL LIABILITY OR UNDER ANY OTHER LEGAL THEORY.
5.4. Amount Limitation. THE OVERALL LIABILITY OF AAS IN RESPECT OF ANY OF YOUR CLAIMS OR THE CLAIMS OF ANY OTHER PERSON IS LIMITED TO (I) AN AMOUNT EQUAL TO THE FEES ACTUALLY PAID BY YOU TO PURCHASE THE SOFTWARE LICENSE OR (II) IF NO FEES WERE PAID, AAS’s LIST PRICE FOR THE SOFTWARE COVERED BY THIS LICENSE.
6. GENERAL
6.1. Confidentiality. You acknowledge that the Software and all Intellectual Property of AAS is the exclusive and valuable property of AAS, its Affiliates, licensors and/or suppliers (collectively, “Confidential Information”). Unless otherwise agreed in writing by AAS or otherwise permitted hereunder, you will (i) treat the Confidential Information as confidential to and as the property of AAS and take reasonable and customary precautions to protect the confidential nature of the Confidential Information; (ii) use the Confidential Information only in connection with the use of the Software; and (iii) not disclose the Confidential Information to any such third party.
6.2. Independent Contractors. This is an agreement between separate legal entities and neither party will represent itself as agent, servant, franchisee, joint venture or legal partner of the other. Neither Party shall have the right to bind the other to any agreement or to incur any obligation or liability on behalf of the other party.
6.3. Governing Law; Jurisdiction. This Agreement will be governed by, interpreted and construed in accordance with the laws of the Province of Québec, Canada and the laws of Canada applicable therein, other than rules governing conflicts of laws. Each party agrees that any dispute arising out of or in connection with this Agreement, including any question regarding its existence, validity or termination, shall be submitted to the exclusive jurisdiction of the courts of the Province of Québec, Canada (district of Montréal). The foregoing choice of jurisdiction and venue shall not prevent either party from seeking injunctive relief with respect to a violation of intellectual property rights, confidentiality obligations or enforcement or recognition of any award or order in any appropriate jurisdiction. The parties expressly disclaim applicability of the terms of the United Nations Convention of Contracts for the International Sale of Goods and any legislation implementing such Convention will not apply to this Agreement nor to any dispute arising therefrom.
6.4. Entire Agreement. This Agreement (as amended from time to time) constitutes the complete agreement between you and AAS and supersedes all prior or contemporaneous agreements or representations or warranties, written or oral, concerning the subject matter of this Agreement.
6.5. No Third Party Beneficiaries. Except as expressly set out in this Agreement, a person who is not a party to this Agreement will have no rights to enforce any terms in this Agreement.
6.6. Transfer and Assignment. You shall not assign, delegate or otherwise transfer this Agreement in whole or in part, directly or indirectly, by operation of law, merger, acquisition, or otherwise without AAS’s prior written consent. Any assignment, delegation or transfer which violates the foregoing will be void. This Agreement is assignable by AAS and AAS is entitled to sub-contract any of its obligations under this Agreement provided that any such sub-contracting will not relieve AAS of its obligations to you.
6.7. Severability. If any of the provision contained in this Agreement are found by a court of competent jurisdiction to be invalid, illegal or unenforceable in any respect, the validity, legality or enforceability of the remaining provisions contained herein shall not be in any way affected or impaired hereby.
6.8. Waiver. The failure of a party to enforce any provision of this Agreement shall not constitute a waiver of such provision or the right of such party to enforce such provision and every other provision.
6.9. Language. The Parties have requested that this Agreement and all documents related thereto be drafted in English. Les parties aux présentes ont exigé que le présent contrat, ainsi que tous les documents y afférents, soient rédigés en langue anglaise.
Preparing your download…
This can take up to a minute.