Objeq
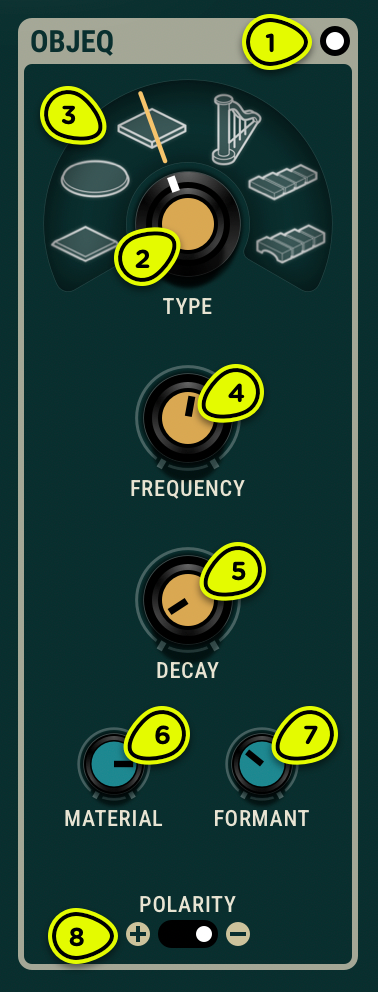
- Bypass switch Puts the Objeq module in and out of the processed signal’s path.
- Object knob Changes the object model, altering the filter’s frequency response.
- Object display Shows the object matching the current filter’s frequency response. Click on an icon to set the filter to that object.
- Frequency knob Sets the filter’s root frequency.
- Decay knob Sets the filter resonance, or decay time.
- Material knob Sets the decay of partials in relation to the fundamental frequency of the object.
- Formant knob Sets the excitation point of the object.
- Polarity selector Inverts the frequency response of the filter.
Overview ⚓︎
The Objeq module is used to filter the input signal through acoustic resonators in order to change their tonal color. A wide variety of effects can be obtained by changing the type of objects and their characteristics.
Controls ⚓︎
Object ⚓︎
The module contains a bank of 17 filters running in parallel: one low-pass filter that represents the fundamental frequency of a resonator object and up to 16 band-pass filters that represents its next 16 modes.
The relative frequency of the filters can be set to match the modes of one of the 6 preset object types by clicking on its icon in the object display. These object types, from left to right, are:
- Rectangular membrane
- Drumhead
- Rigid plate
- String
- Beam
- Marimba
The Object knob allows you to set the object type anywhere between two adjacent objects for a greater creative control.
Modulating the Object knob will produce a nice filter sweep where the fundamental frequency doesn’t change, and higher frequencies change more quickly than lower frequencies.
Frequency ⚓︎
The Frequency knob sets the root frequency (the first partial) of the object. This fundamental frequency relates to the size of the acoustic object. A lower frequency would correspond to a bigger object.
Modulating the Frequency knob with an LFO produces rich filter sweeps. The Pitch modulation source can track the pitch of an incoming audio signal, tuning the object to follow a melody. Double-clicking on the Frequency knob to set it to middle C (261.63 Hz).
For 1:1 pitch tracking:
- Double-click the Frequency knob to set it to middle C (261.63 Hz).
- Set a modulator’s source to Pitch.
- Set the destination to Objeq Frequency.
- Set the polarity to positive and the amount to maximum.
Decay ⚓︎
The Decay knob sets the quality factor, or resonance, of the object. In other words, it controls how long the partials will take to fade out.
Material ⚓︎
The Material knob fixes the decay time of partials as a function of frequency with respect to that of the fundamental. This is a parameter characteristic of the material of the object. In its leftmost position, the decay time of low partials is longer than that of high partials. Turning the knob clockwise increases the decay time of the higher frequencies resulting in a more metallic sound.
Formant ⚓︎
The Formant knob sets the excitation point or where the signal comes in on the resonator. It affects the relative amplitude of the different partials and therefore the spectrum of the sound the resonator radiates.
This percentage value represents a proportion of the overall dimensions of the object. The minimum value of the control corresponds to an excitation applied at the edge of the object while the maximum value indicates an excitation applied at its center.
Polarity ⚓︎
The Polarity selector inverts the frequency response of the object. Negative polarity produces notches instead of peaks in the frequency spectrum.
Usage ⚓︎
The Objeq module transforms the tone of the input signal. We give here a few examples of how the different parameters of this module can be used to obtain specific effects.
Kick and Snare Enhancement ⚓︎
The Object module can transform percussive sounds such as kicks and snares in many interesting ways. When the Frequency parameter is tuned to the fundamental frequency of the original sound, the object reacts strongly to the input signal and mixing both adds resonance or body to the input signal.
- Tune the Frequency parameter to the fundamental frequency of the original sound. This can be done by hear or more precisely by looking at the spectrum of the original sound.
- Use a relatively short Decay time.
- Adjust the Material and Formant parameters to obtain the desired tone.
Increasing the Decay time of the resonator can be used to increase the duration of the sound and add a release phase which was not present in the original signal. A variation of this technique consists in tuning the resonator to an harmonic of the original sound which will enhance it with higher frequencies.
Of course, it is also possible to tune the resonator to a frequency not necessarily related to the input signal. This will add frequency content not present in the original sound. This can be used to transform completely the original sound by listening only to the wet signal (see Mixer module in Section 4.7). In that case, the input signal is simply used as a trigger for the resonators.
Note that finer control of the tone is obtained when using these techniques in conjunction with the First delay line of the Delay module (see Section 4.5). Indeed, using a very short pre-delay can be used to slightly desynchronize the dry and wet signals. In the case of a percussive sound, this can be used to leave the original attack unchanged while adding some resonance or a release phase to the signal. For this type of use, the Feedback parameter of the Delay module must be set to zero in order to avoid echoes in the signal.
Master Filter ⚓︎
The resonators in the Object module are basically filters and can as such be used in any situation where a traditional filter would be used. For example a bandpass filter on a synth sound, a low-pass filter on a DJ console, or a wah on a guitar sound. The filtering effect from these resonators is very rich and therefore the potential for enhancing or transforming a sound or loop is enormous.