Master Clock
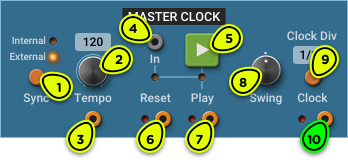
- Sync Selector Select between internal or external (DAW) clock source (plug-in only).
- Tempo Knob Clock tempo in BPM. No effect when Ext input is connected.
- Tempo Output Clock tempo as a voltage. Can be used to synchronize the speed of LFOs, delays or envelope generators to the current tempo.
- Play Input Start and stop the clock from a gate signal.
- Play Button Start and stop the clock manually.
- Reset Output Trig signal generated when the clock starts.
- Play Output Gate signal. High when the clock is playing, low when it is stopped.
- Swing Knob Sets the amount of swing in clock signal. No swing when centered (0%), triplet feel at 67%.
- Clock Division Selector Switches between different divisions for the clock output. For example, sixteenth notes (1/16 division) will produce 4 clocks per beat. Current division is displayed above button.
- Clock Output Clock signal, alternating between high and low (10V and 0V). Clock frequency is determined by the clock division and the tempo.
Overview ⚓︎
The Master Clock module is the main clock and synchronization source for other modules. There are two clock modules in Multiphonics: the Master Clock, described here, and the Clock that can be added to patches that need more clock sources.
This module is always present on the top row and cannot be moved or removed.
Synchronization revolves around four concepts, corresponding to the four module outputs:
- Tempo Main tempo, in BPM, used to set the clock rate. The voltage output is described below in the Synchronizing Rates and Times section.
- Clock A clock signal, alternating between 10V and 0V, running at a user-defined rate, with optional swing. The clock only runs when the Play function is active.
- Play Current playing state. When playing, the Play output is high (10V) and clocks are sent out. When stopped, the Play output is low (0V) and the clock output remains at 0V.
- Reset Triggered every time playback starts.
When running Multiphonics as a plug-in, the Master Clock can be synchronized to the host tempo, and can start automatically when playback is started in the DAW. In addition, the Tempo, Play, Swing and Clock Div settings support automation.
In Depth ⚓︎
Starting and Stopping the Clock ⚓︎
There are many ways to start the clock. The most obvious is to press on the big green play button. The play button LED will turn on, and the clock will run until Play is pressed again.
Another way is to connect a gate signal into the In jack next to the play button. The clock will run for as long as the gate is high. For example, you could connect the keyboard’s gate output to the clock’s play input to run the clock only when a note is played on the keyboard.
When running as a plug-in in a DAW with External Sync mode enabled, the clock will start automatically when playback begins in the DAW, unless something is connected into the In jack. If you want to disable this feature, simply connect an inconsequential source in this jack. For example, you could connect the module’s Reset output in the play In jack.
Finally, the Play button supports automation, so you can draw an automation curve to start and stop the clock.
When the clock starts, it will send a trigger signal on its Reset output. While the clock is running, its Play output will remain high (10V).
Setting the Tempo ⚓︎
The tempo is set with the Tempo knob. Use the shift key while turning the knob for fine adjustments.
When the Sync option is enabled, the tempo is synchronized to the DAW, so the Tempo knob has no effect.
The current tempo in BPM is displayed above the Tempo knob.
Clock Divisions ⚓︎
The Master Clock module generates clock signals at a rate specified by the tempo and the clock division. The possible divisions are:
- 1/4: quarter notes
- 1/4T: quarter note triplets
- 1/8: eighth notes
- 1/8T: eighth note triplets
- 1/16: sixteenth notes
- 1/16T: sixteenth note triplets
- 1/32: thirty-second note
Each press on the Clock Div button will switch to the next division.
Positive or negative swing can be applied with the Swing knob. A standard triplet swing feel is achieved by setting the knob to 67%. Negative swing is also possible, if that’s your cup of tea.
Double-click on the Swing knob to set it to 0% (no swing).
Synchronizing Sequencers ⚓︎
The main role of the Master Clock module is to drive sequencers, such as the Gate Sequencer or the Gate+CV Sequencer.
As you can expect, this is done by connecting the Clock output to the sequencer’s Clock input.
If you want the sequencer to start from the beginning when you press play, you can also connect the Reset output to the sequencer’s Reset input.
Synchronizing Clocks ⚓︎
The Master Clock can be used to control other Clock modules in the patch. Depending on what aspect of the clock you want to synchronize, connect any one of Tempo, Play and Reset from the Master Clock to the corresponding inputs in the other clock modules.
For example, you could only connect the Tempo signal to set all clocks to the same tempo, or only the Play signal to start all clocks together.
Synchronizing Rates and Times ⚓︎
The voltage produced by the Master Clock’s Tempo output can be used to synchronize any frequency rate or time parameter you can find, such as the LFO Rate, the Delay Time, Slew Limiter Rate, or the ADSR Attack, Decay or Release.
See the Sync to Tempo patch in the Basics folder of the Factory collection for an example of the technique described here.
The Tempo signal is 0V for 60 BPM. It increases by 1V for each doubling of the tempo, and decreases by 1V for each halving. So 120 BPM is 1V, 240 BPM is 2V, 30 BPM is -1V, etc. Don’t worry if you don’t understand, you don’t need to know that to make good use of it!
Let’s start with the LFO rate.
- Connect the Master Clock’s Tempo output to one of the LFO Rate knob’s modulation input, and set the modulation depth to 100%.
- Adjust the LFO rate to what you want to hear at the current tempo.
That’s all there is to it. If you change the tempo on the Master Clock module, the LFO rate will follow the new tempo.
You can use the same strategy for any module knob where things go faster when turning the knob clockwise, like the Noise density for example.
For modules with knobs that make things go slower when turned clockwise, such as anything that displays a value in seconds or milliseconds, there is a small difference. Instead of setting the modulation depth to 100%, set it to -100%. For example, to synchronize a delay time, do the following:
- Connect the Master Clock’s Tempo output to one of the Delay Time knob’s modulation input, and set the modulation depth to -100%.
- Adjust the delay time to what you want to hear at the current tempo.
Simple as that.